Larry,
I couldn't use stock Reynard water pipes in the rebuild. Has to do with placement of the nitros bottle...


Larry,
I couldn't use stock Reynard water pipes in the rebuild. Has to do with placement of the nitros bottle...


One advantage is that you already know the Reynard inside and out and have your parts sources identified. If you got a VD or other, you would be at square one and effectively starting all over again.
Besides, if you didn't have the Reynard, you would be spending all those $$$ on likker, 'fast women' and recreational drugs. I don't think Janice would approve of those efforts.
She knows you are safe and sound when she hears you working in the shop late at night.
Folks have been asking for pictures.
The ring and pinion has been inspected.
New bolts in the CV flanges.
New grease in all the CVs.
New Rockers L&R.
New wishbone.
New ARB blade.
One new suspension clevis.
A bunch of new bolts.
Now we have the drivetrain ready, except for the rear cover (still at machine shop).
To get this subsystem together I have to thank: (it takes a village)
Keith Averill
Angelo @ ANZE Suspensions
John at Two Dogg
and Gib Gibson
Hoping to bolt on the motor and try to get it into the chassis soon.
Last edited by Purple Frog; 05.24.10 at 11:19 AM.

Looks like you are making some great progress! Would love to see more photos.

Looks great, Mike!
You sure do things right!
Dave Weitzenhof

OK Mike, you've kept us occupied this winter, reading about your trials and tribulations, on your chassis rebuild. Now I'm ready for some race reports, as you see it, from the drivers seat of your car.
Dave,
Compared to your beautiful Citation, this Reynard looks like it was put together by a kindergarden class using dull scissors.
At 2 this morning i lowered the chassis down to the floor. After something like 90 days of seeing it sitting 40" in the air, I was shocked by how little and LOW the car looked.

LOL, I have that same reaction when I drop ours down off the horses.Originally Posted by Purple Frog

It lasts until the 1st time we put it on the trailer by hand. Then it turns back in to that huge (heavy) mass of steel and aluminum.
90 days.. GOOD JOB, Frog. We are now in to our 2nd year of having the 89SF on the horses.
CREW for Jeff 89 Reynard or Flag & Comm.
You are WAY too modest. I've seen your work!
Funny thing - I have the same reaction every spring when it comes down off the stands.
Dave Weitzenhof
Pouring down rain caused a postponment of one of my construction jobs. So I played in the shop. Speaking of which, the shop is a disaster. At some point I have to pick up and sweep out 90 days of debri.
Fortunately, i got to where i could do a trial fit of motor into chassis. Unfortunately, it will be at least Tuesday before I bolt it all together for good. Keith has to send some more missing parts. When I looked at this car, and then went back to pictures of the car i had in 2003, i noticed some pieces missing. Keith has them on the shelf, so I switch to other parts of the project while waiting on FedX.
At each step as one thinks they are finally checking things off the list, the list grows. For example, this Butler Cricket Farms motor is out of my '05 Runoffs Tatuus. So the fuel pump doesn't fit well against the frame rail. I have to take out the spacer under the pump. Disconnecting the cable drive Jones tach left a big hole in the rear of the oil pump that i need to fill. I'll bolt in the belts and start on pouring/fitting a seat. Doing a seat with the car on 40" stands was a bit too gymnastic an endeavor.
The next two days is supposed to be over 70 degrees with no rain. As soon as the clotheslines dry, I guess i'll be hanging up body panels in the great outdoors paint booth. Wind may not be the only issue, since I haven't decided on a paint scheme. Those that have seen the car in the past may have noticed that the parts that used to be yellow are now silver. I'm not in love with the 8 bright yellow wheels i own. The wheels make up a lot of the car's image when looking at a formula car. I think the scope of the project is again creeping upwards.
If I'm to test at CMP, it has to be in the trailer in 12 days...
Last edited by Purple Frog; 05.24.10 at 11:19 AM.
Looking really good Frog!
Did you have the bell housing bolted to the frame bosses when you did the floor?
Let us know how that mate up goes.
Spacer under the pump? What, do you have a longer actuator rod? We have no spacer but DO HAVE a 'custom' dent in the frame member for the pump. CANNOT take the engine out without removing the pump (or exhaust pipes) first.
CREW for Jeff 89 Reynard or Flag & Comm.
Since the Tatuus used the engine as a stressed member and had no chassis behind the firewall, the height of the fuel pump was not an issue. The Tatuus fuel pump had the spacer under it. It's gone now. Took the shorter rod out of the spare motor.
OBTW i've never had to remove the fuel pump to do an install, even with the taller pump. Must be that my frame rails are bent/hammered a bunch.
Just spent an hour reading 2010 F1 technical articles. Makes an 89 Reynard look like a stone ax.
I did finish the new seat tonight. And i think i have a paint scheme planned. Making a to-do list now to try to stay focused the next few days.
Double-check that the mounting ears on the old pump are flat across - had an oil leak on Dave's old car (while Ken Johnson owned it) that took a while for figure out. Seems that the ears had been drawn inwards with the old spacer ( the spacer crushed over time) and since the new spacer was nice and flat, the pump no longer sealed up nicely. Drove me nuts for an afternoon out at St. Louis before Charlie Williams and I finally figured it out - even Charlie had not seen that happen before!

Frog,
If you are in need of parts being shipped from Keith's, I can drop by and pick them up and bring them down to Atlanta next weekend.
Jason
Even with the precision dent in the chassis tube and no spacer behind the pump, we STILL need to remove the pump or exhaust headers to get the engine/tranaxle out. Only have about 1/16th inch clearance on the header side and you cannot angle the engine enough for the pump to get around the chassis tube.
Last edited by rickb99; 11.21.14 at 3:34 PM.
CREW for Jeff 89 Reynard or Flag & Comm.
The Frogs are happy in the swamp tonight. Our new Stickers have arrived!
Just sipping Crown and trying to decide where on the new paint scheme thay are going to look the best. Guess we finally have to peel those F2000.com stickers off.
Last edited by Purple Frog; 07.27.10 at 1:07 AM.

Can you make that bar removable?
Racer Russ
Palm Coast, FL
Sure, could rework the frame to make that a bolt in brace. But, would also have to relocate it a little as, that is - where the fuel pump ends up. Or, could go to an electric pump if we could find a 2 square inch space to put it.. lol.
As the car has been raced for 20 years like that, we'll just live with it.
CREW for Jeff 89 Reynard or Flag & Comm.
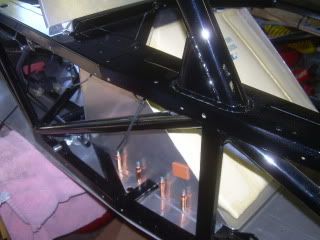
Don't mean to hijack Frog's thread, but I didnt want to start another. Here are a few photos of bladder. Ready to make the final installation with seatback and side supports. Front bulkhead,steering rack,instrum panel have also been installed.Ready to mount new master cylinders and test the clutch now that I have trans trial-fitted.
Last edited by jdp526; 03.17.10 at 6:56 PM. Reason: add
Might be time to think about relocating the mounting points for the shoulder belts, if you plan on using a HANS..............I had do do it after my ground-up, and it presented more challenge!! Bruce ------- Sorry about the continued hi-jack!!!
Yes, now is the time to add bars or whatever, to make it hans compatible.
Averill runs two vertical bars 6" apart between the tube that had the factory belts, and the next tube up that usually holds the head rest.
Also, i couldn't blow up your pictures. Which way are those rivets facing in that fuel cell box? It looks like you have some protruding into the box... possibly not a good thing.

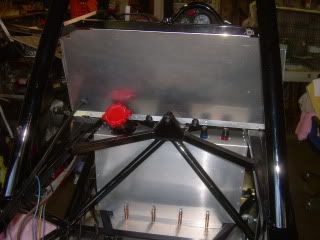
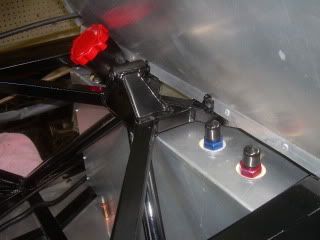
HANS Shoulder Belt Mounts
Thanks 2009 ARRC Champion!
That's the picture I was looking for.
Yup, that's what we did on ours for the belt/HANS points.
CREW for Jeff 89 Reynard or Flag & Comm.
I wasnt sure what the correct mod was for the HANS and it will be several months or longer before I go to any drivers schools. I thought I would run the car in some time trials first and I didnt think the HANS would be necessary. Looks like mod would be easy enough to do if firewall is removed tho.
Mike, all but two rivets are facing outward. The two that are in the corners were flattened with a hammer and dolly. I also used some 3M 1/8x1" silicone rubber strips to line the inside where rivets are placed.
I know you are hesitant to do it now. But now, while the car is apart, is easier than later.
Another consideration for doing it. The old style belt setup, where the shoulder belts go down behind your back, is now consider dangerous on impact. Belts should go basically straight back from the top of the shoulders. So, even without a hans, moving the belts up is a great idea.
Another thought; at our Time Trials (Solo 1) events in the SEDIV, FCs regularily get above 135 mph.

Hard to tell from the angle of the photo, but what size is the tubing supporting the belt mounting points? It looks a little small in that view.
I don't think there's a standard in the GCR, but I would think you'd want those mounting points to be able to withstand something like a 50 g load...so your body weight (not going to guess at that, I don't know you
Here's a document I found useful when designing the shoulder mounting points on our car.
Nathan
Last edited by nulrich; 01.06.15 at 4:16 PM.
I have made the shoulder mounting modification in the photo, to numerous Reynards around here, including the one that flew at this past Run-offs, and if his didn't come apart, then I'm not worried.
It is always comforting to know that Averill Racing Stuff always crash tests all it's proposed changes before presenting them to the public.
But, ... drum roll please, the most comforting thing in the swamp today is the sight of one used-to-be-tattered Reynard standing on it's own, and rolling around the shop with it's little Butler motor all installed.
I hope to fire her up after work today.
Maybe I'll post pictures of the repaired rear cover, etc.
By my calculations I'm now about 1/2 way through with the refurbish.162 hours so far. In a conversation with Gib Gibson last week, he told me he has never completed a frame-up in less than 240 hours. I figure if i were to do as good a job as him, it would take over 325 hours.
Frog,
The hard part has always been, getting you guys to do these types of tests, on your dime, for me.
Glad to hear about your progress.

I did mine a bit different - vertical tubing is welded (Silicone Bronze) top & bottom to a piece of angle steel. Lower is then welded in where the chassis triangulates (where the old mounts were), the upper (also welded) runs the full width of the existing tube and then ties into the fore / aft tube on each side of the roll bar hoop. Also moved the head rest mount back, ran some rectangular tubes horizontal where each set of holes for the seat belts mount. Use a slightly angled belt end plate so the belt is not pinch between the plate and aluminum firewall cover.
John H.
Reynard 88SF
One other thing - I hated sitting directly on the belly pan, if it ever came lose or was punctured then my butt was literally on the line. So I added a small (1/2" high) structure tied into the lower frame rail that I then mounted a sheet of aluminum to so my butt is now held securely.
John H.
Reynard 88SF
Will TIG welding generate too much heat on frame members to use for welding in hans braces?
Last edited by jdp526; 03.18.10 at 10:18 PM. Reason: add
I use a TIG, trick is to keep the heat down, with silicone bronze you should be able to get real close to what you get when gas welding nickel silver. Helps to use AC mode, should be able to get it to flow over a lager area & keep the heat issues to a minimum.
John H.
Reynard 88SF
After studying the 2010 McLaren it was decided that we (Cap'n Morgan and myself) needed to move the ol' Reynard into the new millenium. Being in the deep South, driver cooling is a major concern, as is getting cool air to the carb.
It is going to take another 'bottle of refinement', and a few zip-ties to get the prototype ready for track testing.
Last edited by Purple Frog; 05.09.10 at 1:40 PM.
We gas braze, using (sifbronze) silicone-bronze rod, most of the shoulder mount modification, with the exception of the new bolt locations and where our vertical tubes attach to a reinforcing metal plate, that is brazed to the upper cross tube (to make it stronger). We use this method to lessen the trama to the attachment points of the original chassis (and because I like to use a torch!). Anything else is TIG.
We can't use that method to stall the rear wing in F2000? Why not? Damn...another batch of parts I can't use! I'll throw them on top of the flexible mounts for the barge boards that got banned through Rule 20.
Nathan
In the 'off' evidently one of the oil lines got "stretched" as the diffuser tore off, taking out the bottom rear wing.
Today, I'm about to crank up the motor. I'm pouring in fresh oil, checking battery charges, etc. Then... while walking by the car I notice a few quarts of fresh oil on the floor.
Have i ever told you how far Panacea is from the modern world? Getting Earl's fittings and hose is not an automatic. After a few hours i was able to cobble together a solution at the local mud-bogging machine shop. The problem being they don't use any hoses as small as -10.
So no fire yet.
I'd like to take this time to brag on Keith Averill. During the Valdez ephisode he did talk me off the ledge, and rapidly teach me how to build oil lines. But... more importantly i installed his new rear wing tonight. Every screw hole lined up perfectly with my old end plates and wing supports. Nice work!
My local welder patched up the trany rear cover. And my local machinist (retired CT GE sub builder) milled new flanges out of the welded area, with nice rounded corners and no stress risers. He also cut some new spacers with his lathe, and i trotted home and installed the rear wing using my new design wing supports.
I've envied the VD boys that can lift their cars with the huge diffusers from the rear. So, i ordered some 1/4" 6061 T6 and designed a new rear wing support with built in lift points. Picture below.
The new paint is done. We are ditching the old yellow trim and going with a metallic silver. IMO it really looks a lot wizzier. My little camera just can not capture the purple color correctly, always comes out dark blue.
So now, i need to refit all the repaired panels. I'm thinking of going out tonight and pouring water in the cooling system, just to see how much of that will fall on the floor.
Last edited by Purple Frog; 05.09.10 at 1:40 PM.
Frog,
The mechanics have been there for years. In all high speed situations your ass would pucker up so much your knees had to move. Now all you have to do is connect ass pucker to aero and you're ready for F1.
159 days after the little 'off', Pollywog sits on the floor mostly repaired. And the motor runs.
The camera does not catch the metallic purple correctly. Those yellow wheels have to go! I see a need to buy some more silver paint.
Still a lot to do. She now goes back up in the air so I can try to fit a well used 2008 Radon practice diffuser.
Two pictures. One on Oct 11, 2009, one today. We are ditching the yellow, in favor of silver.
Last edited by Purple Frog; 07.27.10 at 1:07 AM.
There are currently 2 users browsing this thread. (0 members and 2 guests)
 Posting Permissions

 Reply With Quote