Results 1 to 36 of 36
  1. #1
    Global Moderator carnut169's Avatar
    Join Date
    01.22.02
    Location
    Atlanta, Ga
    Posts
    3,700
    Liked: 11

    Default Which bellypan material?

    Replacing the bellypan and want to be sure I make the best choice for material-

    6061 or 7075, .063 , .080 or...?

    Thought I'd do .080 6061 but for roughly the same $$ I can get .063 7075- I have to buy a full sheet but would have enough for 2 floors and there is a min quantity when anodizing anyway. Probably could sell the other 1/2 here if I wanted to go that route.

    Weight should not be an issue, so which would you choose?
    Sean O'Connell
    1996 RF96 FC
    1996 RF96 FB
    2004 Mygale SJ04 Zetec

  2. #2
    Heterochromic Papillae starkejt's Avatar
    Join Date
    07.04.07
    Location
    VA
    Posts
    2,540
    Liked: 3

    Default

    0.080" 6061. Additional chassis stiffness is what you are after. 7075 is not stiffer than 6061.

  3. #3
    Fallen Friend nulrich's Avatar
    Join Date
    11.30.08
    Location
    Lee, NH
    Posts
    913
    Liked: 12

    Default

    How close are you to minimum weight? If you are adding ballast currently, I'd go with stainless rather than aluminum. Can't get the weight any lower than the floor, and stainless is three times stiffer than aluminum and will wear a lot better. You'll need good drill bits.

    If you don't need ballast or want the flexibility to move it around then I'd use .080 6061.

    Nathan

  4. #4
    Contributing Member TimW's Avatar
    Join Date
    01.30.03
    Location
    Santa Cruz, CA
    Posts
    2,570
    Liked: 23

    Default

    If weight is not an issue, I'd do stainless. Its considerably tougher than aluminum thus less likely to fracture when running over something foul.

    Tim
    ------------------
    'Stay Hungry'
    JK 1964-1996 #25

  5. #5
    Global Moderator carnut169's Avatar
    Join Date
    01.22.02
    Location
    Atlanta, Ga
    Posts
    3,700
    Liked: 11

    Default

    Quote Originally Posted by nulrich View Post
    How close are you to minimum weight? If you are adding ballast currently, I'd go with stainless rather than aluminum. Can't get the weight any lower than the floor, and stainless is three times stiffer than aluminum and will wear a lot better. You'll need good drill bits.

    If you don't need ballast or want the flexibility to move it around then I'd use .080 6061.

    Nathan
    I crossed the scales at 1201lbs with no gas last race. I am figuring the current floor weighs about 20lbs with the aluminum & Jabrock- I could go with .090 6061 and still drop 7lbs +/- (enough to finish with a little more fuel).

    Stainless is nice but much harder to work with (drill, counter sink). I don't mind doing a floor every 5 years (hoping for the same results Steve L gets).
    Sean O'Connell
    1996 RF96 FC
    1996 RF96 FB
    2004 Mygale SJ04 Zetec

  6. #6
    Senior Member
    Join Date
    08.18.02
    Location
    Indy, IN
    Posts
    6,282
    Liked: 1871

    Default

    You'll get those results only if you go the extra rivet strip route - the current shear area of just the 1" wide lower rails is not enough to not be over-tasked, and going to stainless will load the bond line even more because of the extra stiffness of that material compared to alu.

  7. #7
    Senior Member
    Join Date
    01.11.05
    Location
    Zionsville, Indiana
    Posts
    3,169
    Liked: 1397

    Default

    Richard brings up a very good point. If you don't get a good bond between the frame and the belly pan then you do not get the benefit that you should.

    .063 aluminum will conform better than .080 and definitely better than stainless.

    I do not know how the bond between stainless vs. aluminum to a steel tube frame compares. My guess is that aluminum would be better.

    The glue and the bonding surface area are the keys to belly pans. Rivets serve to give peal strength. The sheer strength is in the glue.

    For ballast, we are using steel plates in place of jabroc on the bottom of the car.

    I like not using the structural bottom of the car as the skid against the ground. That is the main reason that I step the bottom of the frame from the dash to the front bulkhead. Makes space for a thick skid.

  8. #8
    Contributing Member formulasuper's Avatar
    Join Date
    08.17.03
    Location
    Marietta,Ga.
    Posts
    2,710
    Liked: 61

    Default

    Quote Originally Posted by R. Pare View Post
    You'll get those results only if you go the extra rivet strip route - the current shear area of just the 1" wide lower rails is not enough to not be over-tasked, and going to stainless will load the bond line even more because of the extra stiffness of that material compared to alu.
    True, however I'd think he'll get better intrusion protection with the stainless steel. Good to protect the driver's bottom end when bouncing over those unseen rocks hiding in the tall grass while doing some unplanned off course agricultural racing!
    Scott Woodruff
    83 RT5 Ralt/Scooteria Suzuki Formula S

    (former) F440/F5/FF/FC/FA
    65 FFR Cobra Roadster 4.6 DOHC

  9. #9
    Senior Member
    Join Date
    08.18.02
    Location
    Indy, IN
    Posts
    6,282
    Liked: 1871

    Default

    Another issue is that stainless needs to be passivated to ensure that the bond lasts as it should.

    With either material, you will want to scuff the bond area with 36 grit sanding paper so as to give it as much "tooth" as you can ( more bonding surface). In doing the aluminium, don't use aluminium oxide grit paper - any grit imbedded into the surface will cause rapid oxidation even after anodizing (which is an absolute "must" for alu pans).

    Also, don't rely on just the force of the rivets to clamp the pan down correctly (especially if the lower rails aren't perfectly flat and square to one another ) - use c-clamps and wood blocks to squeeze out the excess glue, and rivet in between, move the clamps, and rivet in between again.

  10. #10
    Contributing Member RobLav's Avatar
    Join Date
    12.05.00
    Location
    Somerset, Kentucky
    Posts
    2,914
    Liked: 126

    Default

    I used 6061 T6 at .090 because I owned the material at the time (2008). Also welded the inner steel strips and used CherryMax and steel for rubbing. Zetec car weighed 1140 lbs with me in it. Pan still super strong. And rather than anodizing, I used Alodine.

  11. #11
    Senior Member
    Join Date
    08.18.02
    Location
    Indy, IN
    Posts
    6,282
    Liked: 1871

    Default

    Quote Originally Posted by formulasuper View Post
    True, however I'd think he'll get better intrusion protection with the stainless steel.
    True, but to perform that task to it's best, the pan needs to stay attached - some of you may recall a picture back in the old FF Underground of a VD that got launched a few feet up in the air over a curb, and the front half of the pan hanging down and flapping in the breeze. Can't think of the drivers name at the moment, but he was from Illinois if I remember correctly.

    The pan also performs the task of reinforcing the lower portion of the frame in a frontal crash - if the bonding and rivets are easily ripped, the frame will collapse much faster and much further into the driver than it would if the pan stayed attached.

  12. #12
    Senior Member kea's Avatar
    Join Date
    12.17.00
    Location
    madison heights,mi
    Posts
    3,267
    Liked: 601

    Default Belly pad

    Sean,
    Your mail box is full..
    Keith
    Averill Racing Stuff, Inc.
    www.racing-stuff.com
    248-585-9139

  13. #13
    Global Moderator carnut169's Avatar
    Join Date
    01.22.02
    Location
    Atlanta, Ga
    Posts
    3,700
    Liked: 11

    Default

    Quote Originally Posted by kea View Post
    Sean,
    Your mail box is full..
    thanks keith I deleted some messages
    Sean O'Connell
    1996 RF96 FC
    1996 RF96 FB
    2004 Mygale SJ04 Zetec

  14. #14
    Fallen Friend Northwind's Avatar
    Join Date
    04.06.07
    Location
    Marquette, Mi.
    Posts
    906
    Liked: 43

    Default

    What's the opinion on rivet material?

    Aluminum body rivets with aluminum floor?

    Stainless body rivets on aluminum floors?

  15. #15
    Global Moderator carnut169's Avatar
    Join Date
    01.22.02
    Location
    Atlanta, Ga
    Posts
    3,700
    Liked: 11

    Default

    I am using Cherrymax aluminum countersunk rivets, 5/32", and will install them in a zig zag pattern about 1" apart.

    I think steel rivets on an aluminum pan is not ideal.
    Sean O'Connell
    1996 RF96 FC
    1996 RF96 FB
    2004 Mygale SJ04 Zetec

  16. #16
    Contributing Member Rick Kirchner's Avatar
    Join Date
    02.24.02
    Location
    Tehachapi, CA
    Posts
    6,504
    Liked: 1474

    Default

    Marc Bahner told me that since the "nail" in a rivit has the same breaking strength regardless of whether it's an aluminum rivit or a steel one, the aluminum rivit will pull up and clamp harder because less force will go into deforming the rivit and more will go into clamping force before the nail breaks.

  17. #17
    Member
    Join Date
    11.27.06
    Location
    Someset NJ
    Posts
    55
    Liked: 8

    Default

    Perhaps a bit off topic (hope not) but what type of glue is normally used to bond the
    bellypan to the frame ? Also does the type of glue matter if its aluminum or stanless steel ?
    Thanks !

  18. #18
    Fallen Friend Northwind's Avatar
    Join Date
    04.06.07
    Location
    Marquette, Mi.
    Posts
    906
    Liked: 43

    Default

    Rick,

    That is providing the nail is steel on both rivets, correct?

  19. #19
    Classifieds Super License Rick Iverson's Avatar
    Join Date
    09.05.02
    Location
    Destin FL
    Posts
    4,843
    Liked: 645

    Default

    Quote Originally Posted by Rick Kirchner View Post
    Marc Bahner told me that since the "nail" in a rivit has the same breaking strength regardless of whether it's an aluminum rivit or a steel one, the aluminum rivit will pull up and clamp harder because less force will go into deforming the rivit and more will go into clamping force before the nail breaks.
    Rick, what about dissimilar metal (aluminum/stainless) galvanic corrosion?

  20. #20
    Contributing Member Pop Chevy's Avatar
    Join Date
    10.12.09
    Location
    Sarver, Pa
    Posts
    848
    Liked: 27

    Default

    Speaking of bonding materials (glue) , I am having great sucess with Fuzor products. I have been using it to bond steel repair panels on trucks and have used their products on SMC and for fiberglass repairs. Also used another of their compunds to repair my front crash box (attenuator) that had the wing mounts torn out. Very pleased with the results. They have a range of products for all kinds of applications.
    God is my pilot, I'm just the loose nut behind the wheel !

  21. #21
    Member
    Join Date
    11.27.06
    Location
    Someset NJ
    Posts
    55
    Liked: 8

    Default

    Thanks Pop Chevy,
    I did a search and fusor by Lord corporation came up.
    I take it you use Fusor 112B ? I'm guessing you have to remove the paint from the
    frame to bare metal but I suppose instructions are included anyway.
    thanks again !

  22. #22
    Contributing Member formulasuper's Avatar
    Join Date
    08.17.03
    Location
    Marietta,Ga.
    Posts
    2,710
    Liked: 61

    Default

    Quote Originally Posted by Rick Kirchner View Post
    Marc Bahner told me that since the "nail" in a rivit has the same breaking strength regardless of whether it's an aluminum rivit or a steel one, the aluminum rivit will pull up and clamp harder because less force will go into deforming the rivit and more will go into clamping force before the nail breaks.
    A Cherymax rivet has a hardened steel pin that is pulled up to set the rivet & then a top lock ring is pressed down by the rivet gun's head into the top of the rivet head to lock the pin in place before the pin breaks. It takes considerable more force to break the pin than does the cheaper standard aluminum rivets seen used in many cars.
    Scott Woodruff
    83 RT5 Ralt/Scooteria Suzuki Formula S

    (former) F440/F5/FF/FC/FA
    65 FFR Cobra Roadster 4.6 DOHC

  23. #23
    Global Moderator carnut169's Avatar
    Join Date
    01.22.02
    Location
    Atlanta, Ga
    Posts
    3,700
    Liked: 11

    Default

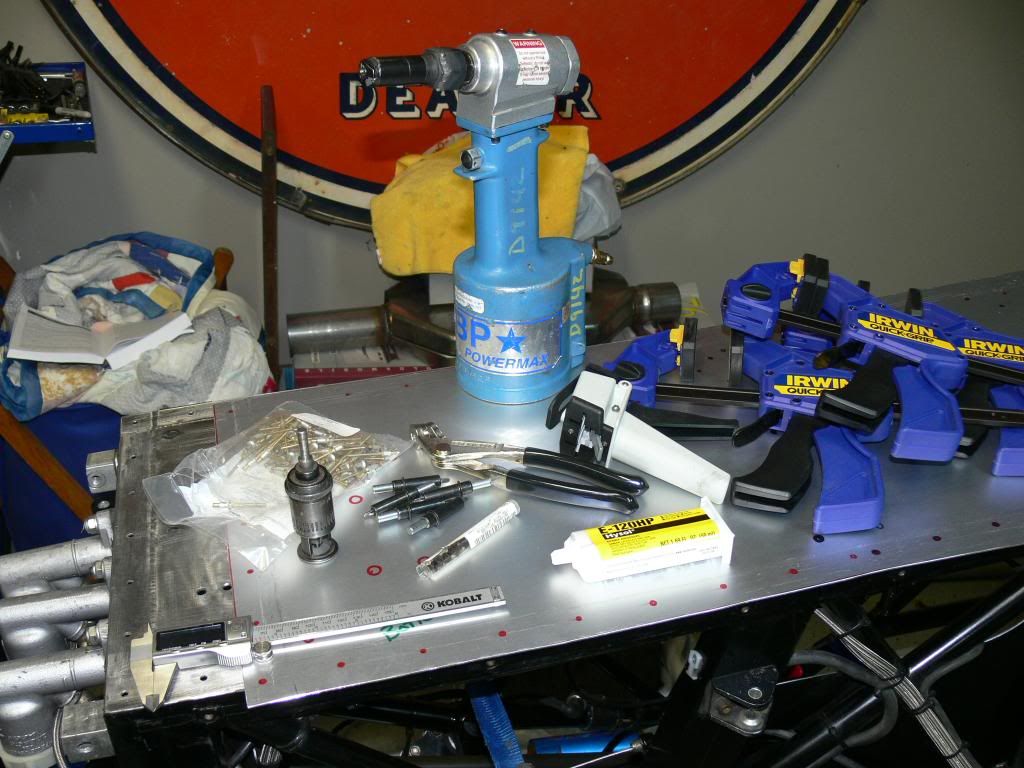
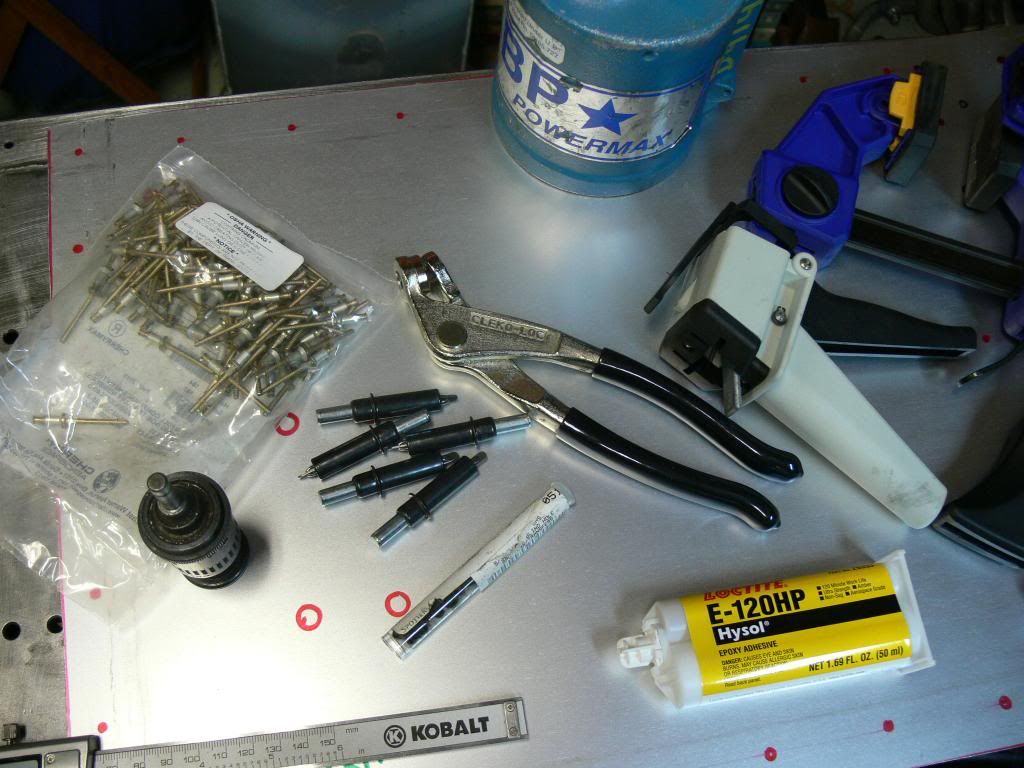
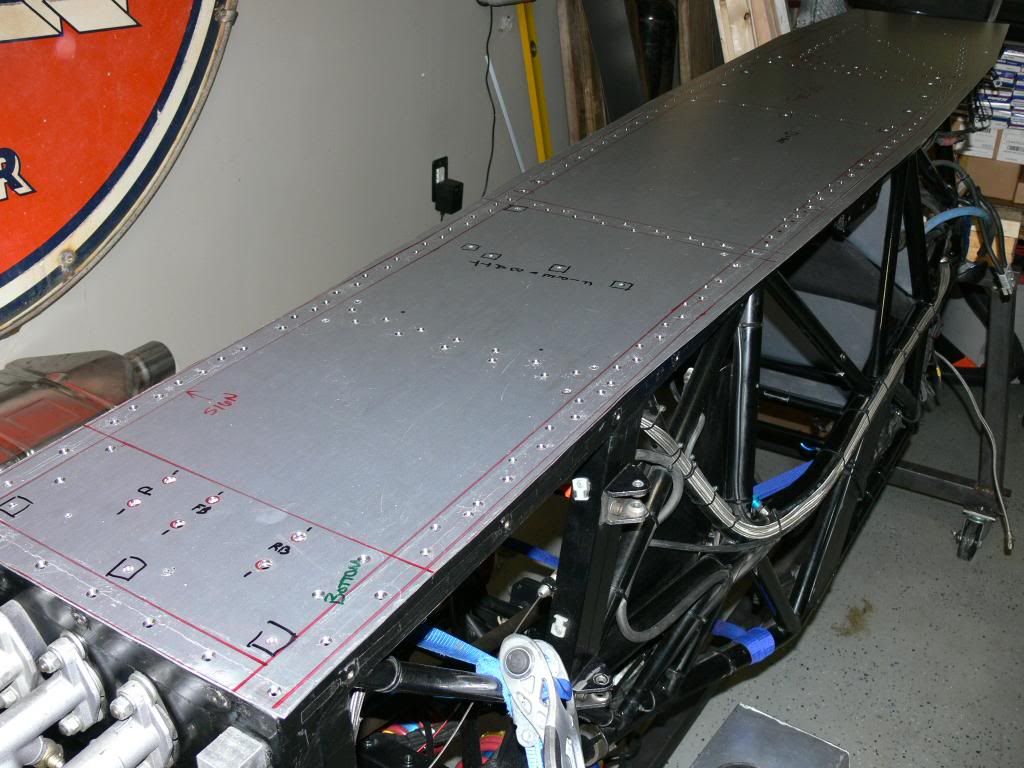
    Here are the tools I'm using- hole finders, clekos, 5/32 and 3/16" Cherrymax riverts (3212-5-03 and 3212-6-03) and a CherryMax puller, counter sink stop and appropriate cutters, #10 and #20 drill bits. Hysol e-120hp with the gun and mixer nozzles, and clamps.


    and after a few long nights of transferring holes and drilling:

    Sean O'Connell
    1996 RF96 FC
    1996 RF96 FB
    2004 Mygale SJ04 Zetec

  24. #24
    Contributing Member formulasuper's Avatar
    Join Date
    08.17.03
    Location
    Marietta,Ga.
    Posts
    2,710
    Liked: 61

    Default

    Looking like a professional job!
    Scott Woodruff
    83 RT5 Ralt/Scooteria Suzuki Formula S

    (former) F440/F5/FF/FC/FA
    65 FFR Cobra Roadster 4.6 DOHC

  25. #25
    Contributing Member Rick Kean's Avatar
    Join Date
    03.25.10
    Location
    Houston
    Posts
    570
    Liked: 7

    Default

    Sean,

    How many cartridges of Hysol E-120 do you anticipate using for this job?

    Rick Kean

  26. #26
    Global Moderator carnut169's Avatar
    Join Date
    01.22.02
    Location
    Atlanta, Ga
    Posts
    3,700
    Liked: 11

    Default

    I purchased 3... hope thats enough!
    Sean O'Connell
    1996 RF96 FC
    1996 RF96 FB
    2004 Mygale SJ04 Zetec

  27. #27
    Contributing Member Rick Kean's Avatar
    Join Date
    03.25.10
    Location
    Houston
    Posts
    570
    Liked: 7

    Default

    Sean,

    So, that's 150ml.

    What is the coverage area for your job; ~240 sq. in.?

    Thanks,

    Rick Kean

  28. #28
    Contributing Member formulasuper's Avatar
    Join Date
    08.17.03
    Location
    Marietta,Ga.
    Posts
    2,710
    Liked: 61

    Default

    Quote Originally Posted by carnut169 View Post
    I purchased 3... hope thats enough!
    I would guess you have WAY more than you need. About 99.9% will squeeze out when you clamp & rivet it down.
    Scott Woodruff
    83 RT5 Ralt/Scooteria Suzuki Formula S

    (former) F440/F5/FF/FC/FA
    65 FFR Cobra Roadster 4.6 DOHC

  29. #29
    Global Moderator carnut169's Avatar
    Join Date
    01.22.02
    Location
    Atlanta, Ga
    Posts
    3,700
    Liked: 11

    Default

    Right. I used 2 but probably could have used one.
    Sean O'Connell
    1996 RF96 FC
    1996 RF96 FB
    2004 Mygale SJ04 Zetec

  30. #30
    Contributing Member problemchild's Avatar
    Join Date
    10.22.02
    Location
    Ransomville, NY
    Posts
    5,729
    Liked: 4346

    Default

    Can someone advise a suitable width/size of the bead of glue to use on a 1" wide square tube to get a good bond without excessive waste as it squeezes out?
    Thanks!
    Greg Rice, RICERACEPREP.com
    F1600 Arrive-N-Drive for FRP and SCCA, FC SCCA also. Including Runoffs
    2020 & 2022 F1600 Champion, 2020 SCCA FF Champion, 2021 SCCA FC Champion,
    2016 F2000 Champion, Follow RiceRacePrep on Instagram.

  31. #31
    Grand Pooh Bah Purple Frog's Avatar
    Join Date
    04.03.01
    Location
    Havana, Fl, USA
    Posts
    10,777
    Liked: 3787

    Default

    I put mine on at about 1/4" down the center, then spread it with a plastic spatula to cover full width of tube. I had 40 minutes to work with and time was not an issue. Dropped the floor on the glue, held in place with clecos in a few places. Janice dropped rivets in ahead of me, and I pulled them with a Harbor Freight air gun. Bang bang bang. Done with time to spare.


  32. #32
    Contributing Member formulasuper's Avatar
    Join Date
    08.17.03
    Location
    Marietta,Ga.
    Posts
    2,710
    Liked: 61

    Default

    Quote Originally Posted by problemchild View Post
    Can someone advise a suitable width/size of the bead of glue to use on a 1" wide square tube to get a good bond without excessive waste as it squeezes out?
    Thanks!
    You could try a test before you start by using any 1" wide strip of metal or wood & clamp it to any flat surface to check for sqeeze out of different size beads. You'll be very surprised at how little is needed. In the aviation industry the sealant is rolled on with a stiff foam 2" diameter roller & there is still plenty of sqeeze out.
    Scott Woodruff
    83 RT5 Ralt/Scooteria Suzuki Formula S

    (former) F440/F5/FF/FC/FA
    65 FFR Cobra Roadster 4.6 DOHC

  33. #33
    Senior Member
    Join Date
    11.27.10
    Location
    Raleigh NC
    Posts
    426
    Liked: 62

    Default

    Along the same lines, in Tom Johnson's Bellypan Bonding 101 article, he mentions the use of a conversion coating on the aluminum as an alternate to professional anodizing.

    Has anyone actually followed this route on their aluminum pan? If yes, exactly what product did you use?

    Thanks,

    Glenn

  34. #34
    Fallen Friend Northwind's Avatar
    Join Date
    04.06.07
    Location
    Marquette, Mi.
    Posts
    906
    Liked: 43

    Default

    Allodine 1201 and Alumiprep 33 supplied by Aircraft Spruce. Directions for the treatment process will be sent with your order or is available with a tech bulletin available on there web site.

  35. #35
    Senior Member SamF's Avatar
    Join Date
    12.08.09
    Location
    Cincinnati Ohio
    Posts
    270
    Liked: 25

    Default Rivet Supplier needed

    [FONT=Calibri]I am getting ready to install the floor on my new FST/FV; it is going to be 6061-T6 0.63 and glued in place. I want to use 3/16 120-degree countersunk blind rivets to install this floor.[/FONT]


    [FONT=Calibri]I was planning to use a stainless steel rivet with a steel stem, or would an aluminum Cheery rivet with a steel stem be adequate? What about “Cherry-Q” rivets[/FONT]

    [FONT=Calibri]I know this is a -6 rivet and the grip length I need is a -4, are there any recommended rivet part numbers and more importantly recommended suppliers to buy the 100 odd rivets I need?? [/FONT]

    [FONT=Calibri]Sam[/FONT]

  36. #36
    Senior Member
    Join Date
    01.11.05
    Location
    Zionsville, Indiana
    Posts
    3,169
    Liked: 1397

    Default

    Quote Originally Posted by SamF View Post
    [FONT=Calibri]I am getting ready to install the floor on my new FST/FV; it is going to be 6061-T6 0.63 and glued in place. I want to use 3/16 120-degree countersunk blind rivets to install this floor.[/FONT]


    [FONT=Calibri]I was planning to use a stainless steel rivet with a steel stem, or would an aluminum Cheery rivet with a steel stem be adequate? What about “Cherry-Q” rivets[/FONT]

    [FONT=Calibri]I know this is a -6 rivet and the grip length I need is a -4, are there any recommended rivet part numbers and more importantly recommended suppliers to buy the 100 odd rivets I need?? [/FONT]

    [FONT=Calibri]Sam[/FONT]
    You are going for over kill.

    First, don't use stainless rivits because they are very difficult to remove without enlargening the holes in the frame. Use 5/32 rivits instead of 3/16. Just place the rivits closer.

    If you have a line of rivets currently, just use a pattern that misses the existing holes. Most belly pans are have the rivets in a line down the center of the tube. Stagger the new rivets either side of the center of the tube. In the corners of the frame, add 18 ga. steel strips for more rivets.

    You can get 5/32 in standard and oversized. Use standard the first time through and then you have the oversized rivets for repairs.

Thread Information

Users Browsing this Thread

There are currently 1 users browsing this thread. (0 members and 1 guests)

Posting Permissions

  • You may not post new threads
  • You may not post replies
  • You may not post attachments
  • You may not edit your posts
  •  


About Us
Since 2000, ApexSpeed.com has been the go-to place for amateur road racing enthusiasts, bringing together a friendly community of racers, fans, and industry professionals. We're all about creating a space where people can connect, share knowledge, and exchange parts and vehicles, with a focus on specific race cars, classes, series, and events. Our community includes all major purpose-built road racing classes, like the Sports Car Club of America (SCCA) and various pro series across North America and beyond. At ApexSpeed, we're passionate about amateur motorsports and are dedicated to helping our community have fun and grow while creating lasting memories on and off the track.
Social