


Hello all, as we’re waiting for the new year to kick in, wanted to share my project I’ve been working on for the past year. Around August 2016, I picked up Bill Wald’s # 03 car from Florida. A relatively stock 2007 Stohr with GEN2 body-work and a William’s diff.
Here’s the car as it stands at time of sale:
Car was in Florida, I’m in Northern CA – almost as far as we can get! After a few snags with shipping companies, Bill pointed me to Athena who was easy to work with and prompt. My initial contacts with BATS failed. Kept getting the run-around for about 2 months with promises to pick-up the car but to no avail. Anyway, the car is ready and loading up. Note, spare engine in the crate
Here we go!
In the meantime, I scored on a 20’ Pace Shadow GT trailer in Arizona. I've always had my eye on a Shadow GT and see them creep up every now and then. I was lucky enough to stumble on it late night browsing craigslist. Called the guy on a Friday night and told him I'll hit the road in the morning. Road trip here I come!
I got on the road at 4AM Friday morning and returned back home at 3AM the next day. Did the round-trip from San Jose to Phoenix and back all in one day with the only stops for gas and food. What an adventure, not sure I can do that again! Did I say it was 1400 mile round trip? Gas mileage on Tacoma wasn't all that great. I was getting maybe 10-11 mpg driving 70ish on the freeway - and this was with an empty trailer! I could almost see my gas gauge go down in realtime.
Some time later, I get a call from the Transport company telling me he's close by. He unloads the car and all spare parts. Everything made it self from Florida. Whohoo
This was my first FB car and didn’t know what to expect. I immediately started taking off the body work to get a closer look at everything.
The car is very easy to work with and almost a pleasure to tinker with. There was a GoPro camera mount I wanted to remove over on the driver’s left which began this whole project (seriously!). Anyone who has taken off a gopro mount before knows once they stick, they’re almost impossible to remove. Well…I got the mount off and along with it some paint was lifted.
I’m a OCD kinda guy. Everything has to be perfect, even for a race car. So it begins…
Picked up a short quart of single stage paint and liked the results. This was my first time spraying on anything but from a rattle can. Found a good deal on a spray gun from Amazon and off I went. The beauty of single stage is that it has clear-coat mixed in. You spray it once and you're done. I sanded the existing body work, filled anything that needed filled and went at it.
I decided to spray in my garage with all doors closed. It was winter time and raining here in San Jose, so spraying outside was not an option (not that I would do that) After spraying the first panel, I quickly realized how fine the paint atomizes and gets on EVERYTHING!! With more body parts left to go, picked up a roll of plastic and tried to cover everything up. Although it helped, I was unfortunaltey too late. The garage and everything in it had a fine layer of orange.
For my first paint job, I think it came out pretty good. All the decals were cut by me. My girlfriend has a Cricut machine, which is a scrapbooking printer. It's esentially a printer with an exacto blade (to me, I used it as a vinyl cutter). Simply download the fonts you want/need, sketch it up and cut away. I bought a couple foot rolls of black and white vinyl with many feet to spare.
I had the car covered up with black cloth, but the paint found itself and got essentially everywhere.
I got in touch with Jesse @ BRD to get some new floors and diffuser. The floors which came with the car had an inner wood structure which apparently was tailored for a 150lb driver to meet the 1000 lb min requirement. Given the unneeded ballast and now orange covered floors, I decided to get a new set. Took some measurements of the rod pickup hard points for Jesse and waited for parts to arrive.
More orange…
My next step was to clean up the control arms. They were all rusted in some spots and needed a refresher. I removed them, stripped the powercoat (and burnt my arms/eyes with the solvents in the process) and sprayed them with a stainless steel spray from Seymour Paint (p/n 620-1460). This paint was pretty cool, it had actual pigment flakes of SS within it. You could see the little pieces flying off the tip as you sprayed. The paint was even and covered very well.
I picked up a oil new catch can to pipe in from the breather tube and messed around with mounting a bit. The location between the spar and motor seems to fit fine.
For the front arm, I got lazy and just painted over the existing paint (my OCD later removed all the arms, stripped them down to bare metal and repainted)
Chain replacement was due, so got to disassembling the rear spar and got familiar with the assemblies.
Took a peak at the underside and noted the floor had seem some off-road fun. I'll add this on my replace list.
At this point, I became interested in the frame mods Jake had done to reinforce everything. He had added additional bars throughout the car to increase ridgitidy. I spoke with Jesse and a few other shops to see where they found the Stohr to be weak. With all the body-work off the car, I thought why not - this was a perfect time to get this out of the way. I got a hold of Stan Clayton from Dauntless Racing and provided some pictures and info on what I wanted to do. I was truly lucky to have Stan and the crew close-by (within half-hour from home) to help me with the framework. With Stan/Dauntless staged to work on the frame, I went ahead and proceeded taking apart the car.
I took as much pictures as I could and removed the wiring first. Some of the wiring was kinda crispy and seen some age. I add this on my list to cleanup.
To remove the engine, I initially tried to use some ratcheting tie-down to lift the motor up from a roof hoist. My tie-downs ended up being too long and didnt lift the motor high enough. I found a cool (1 ton?) chain hoist from Harbor Freight for something like $25. Best money spent!
Motor & spar removed from frame
Note the fuel line routing before removal. These lines are kinda dried up and will add those on the to-do list. Regulator in the back and filter will go as well.
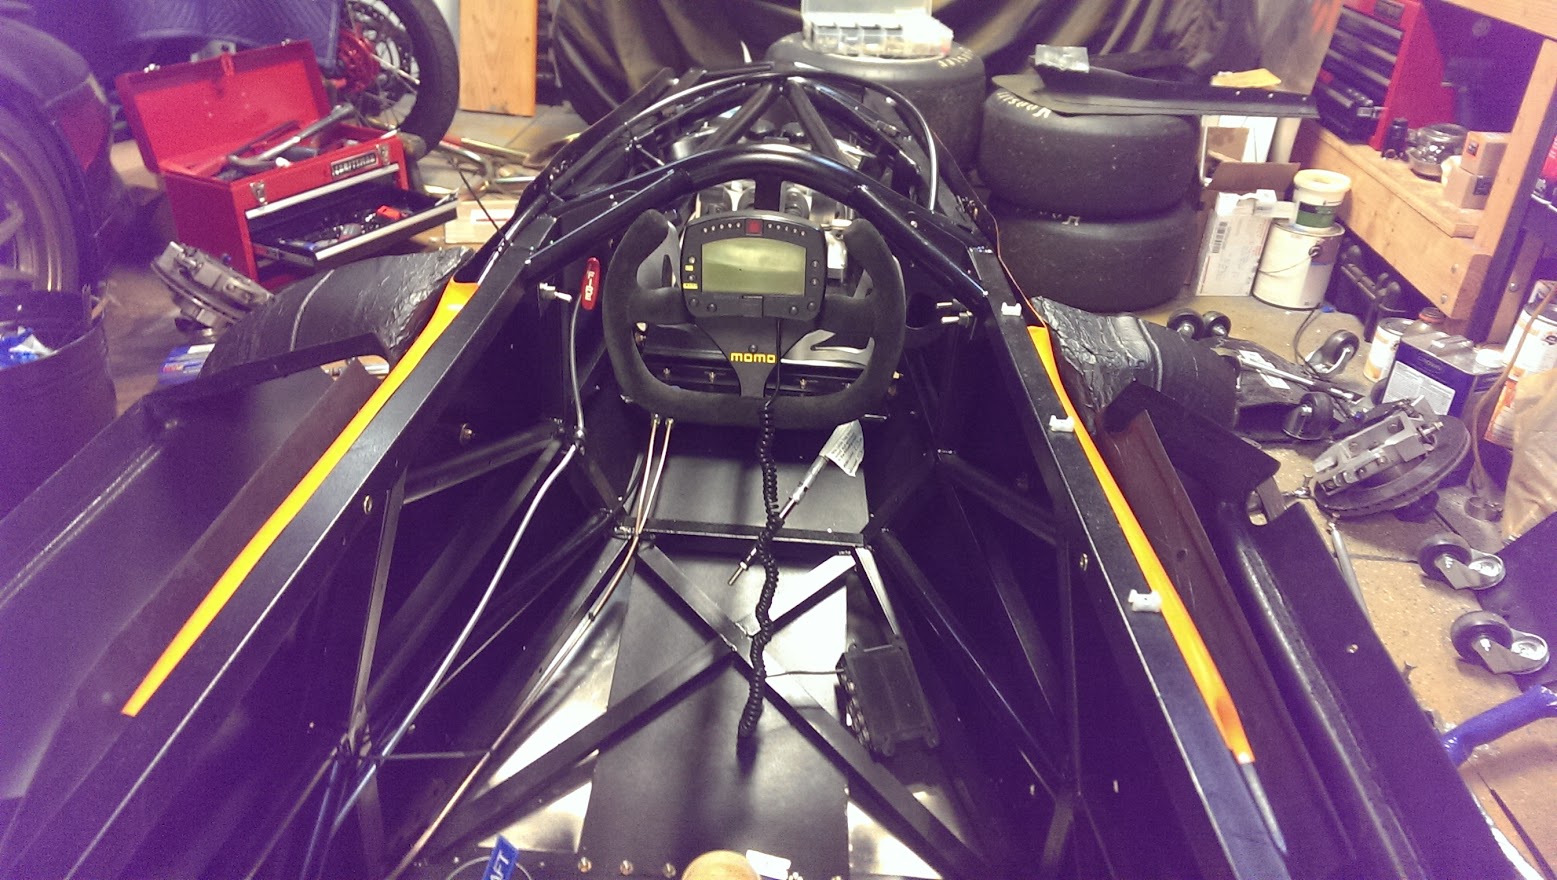
Some interior stuff
Almost there, a few cables to remove
All done, ready for Stan and team to do his magic
I had ordered some BRD 1:1 bellcranks and they came in with needle bearings ready to go.
Upon inspection of the frame in daylight, we found many cracks. Particularly all frame members behind the bulkhead had cracks, including motor mount areas. The rear bulkhead was of the older design as well, where the motor mounts consisted of a thin gauge metal. I forgot to mention, the frame was dropped off at the shop and met some new faces, Kevin Mitz, John and Billy. Awesome guys and very helpful. With the back half of the frame chopped off, it’s ready for sandblast.
New bars and rebuild in the jig. The team incorporated the latest motor mount design in the rear. Notice the flat beefy bars. These will not crack!
Dropped off the spar to get it fitted to my setup just to make sure. Frame is ready for Kevin to weld.
More added bars by steering. These do not interfere with my hands or the wheel. I did however have to make new switch panels which mounted in that area.
Check out the frame bottom X braces. This was on of Stan's new designs and incorporated that in this frame.
While the frame was getting rebuilt, I started taking apart the stuff I had in my possession. Esentially stripped everything down and repainted fresh.
Fuel cell and lines have seen some life. Based on the date markings on this fuel cell, it appears to be the original unit when the car was built in 2007. Per recommendation from John, I opted to replace it. I also replaced the old fuel pressure regulator with an Aeromotive one.
Floor to bare metal.
I started taking a look at the brake/clutch lines and wanted to redo the fittings and way it was configured. I ended up running new brake/clutch hardlines and replaced all braided lines thoughout the car everywhere.
Remember the damaged floors? Fresh new set installed by Stan.
Tea tray was beat, so ordered a new piece.
Stan calls – frame is ready! Oh ya, rebuild begins! This should be easy, right?
The car originally came with two pull/push shifter cables. Stan has a nifty single cable shifter and went with that configuration. One less cable and more robust solution. The new cable is substaintally bigger in diameter, but works very well. I've been told this cable will never snap!
Pegasus was my new go-to shop and bought everything I needed from there. Orders were processed fast. I had a list of all the bolts, nuts I needed in advance and got them almost right the first time. I did have to order maybe 4 more different sets for other various stuff.
Parts freshly painted and new fasteners everywhere! This is the first piece I started on. Getting new brake lines installed with new bulkhead fittings with fewer pieces and much cleaner.
I ran new clutch/brake lines and flared them with a new Parker tool. Very easy and fun to work with.
Replaced new steering bearings in the frame and installed the steering shaft.
Also replaced ALL heim joints.
Here's a picture (not my car) of the single cable setup. Stan has the brackets to order.
Had to widen the existing brackets by the shifter to accommodate the larger cable diameter.
Also had to install a washer to shim this to fit. The cable now does not move forward/aft.
The old fire bottle was expired, so I bought a Safecraft unit running Novec. Ran new lines in both driver & engine area. Safecraft was local to me so I drove there and picked up the unit directly. The guys there were very nice and helpful. I’ve very glad I went with them. Note new fuel cell.
Here are one of the new switch aluminum panel I had to make, due to the new diagonal frame brace getting in the way with the original unit.
Recall a few pictures back of the bottom of the fuel cell? It had impression marks from digging into the frame rail. To mitigate that, I had Stan mount a flat floor bottom to have a flat surface for the fuel cell to sit on. Doing so caused the fuel cell to sit 1” higher than before. With that, I had to make new side plates for the fuel cell and cut the covers to fit.
OK, ready for some bodywork and to make this thing look like a car again. Side panel installed along with oil and radiator ducts.
I ended up stripping the SS Seymour paint from all control arms (again) and coated the bare metal them with Penetrol which protects it from rust. GIves it a cool raw metal look. Apparently this cannot be sold in CA, but managed to sneak a bottle in.
Took apart all the heat wrap from the oil lines and found an in-line filter. Hmm…wonder if it’s ever been replaced. I got rid of it entirely and will run new oil lines everywhere. I opted to use the XRP push fitting lines with a crimp style ring to prevent slippage.
Check out this tool from Kool Tools which makes installing the fittings a snap! You simple put the fitting at the end and clamp the hose on the other end. By using a drill or impact wrench, there is a screw type mechanism which pushes the hose to the fitting. No more heating the hoses and fighting it to slip on. So nice!
OK, motor time. Harbor Fright chain hoist in action!
Never a dull moment, the header is hitting a new frame member. A quick call to John and he says no problem, Kevin can take care of this. OK, so off I go and load up the car to get a new pipe welded.
New motor mount blanks ready for drill/tap.
Remember the new single pull/push cable. It’s a hefty piece. Had to find a cable route which would not want to coil and snap back.
Next up, thought it’d be a good idea to replace all master cylinders. The car was equipped with Wilwood units. Bought the Tilton equivalents.
I had to cut the rods a bit as the ones it came with was too long. I initially cut and tapped a new thread on them. I then found a shortened rod directly from Tilton and ended up ordering those. They had a cleaner thread than the version I had tapped.
Also installed a new Tilton balancer bar and adjuster while I was at it.
Wheels installed to load up in trailer to head down to John's shop to weld and fix the header issue.
All done ready to go. Kevin is really skilled at this. I don't know how he does it, but he has a vision on pipe routing.
Note to self, I gotta get me one of those table stands.
Meanwhile back home, the BRD floor and rear diffuser came in. Got everything aligned to drill holes on the diffuser.
The rear brakes calipers which came with were the original Wilwood two piston units. Bought some new 4-piston calipers, which needed new brackets to go along with that. Thanks again to John for getting these CNC’d. The offset spacing and hole patterns were different. After a few iterations, we nailed this one down.
Next up are the rear-axles. Took them apart to inspect the CV joints. It appears they have seem some water damage and were pitted & discolored. Ordered some new lobro joints from Pegasus, got new boots for on side and repainted the axle itself with engine enamle (and baked it). This was my first time messing with this type of CV joint. Getting the balls in the first time was a frustrain PITA. After I figured it away, it was actually kinda fun. And yes, I was cautioned on how these can be installed wrong and bind. Thank you for the heads up John!
Back to the car. Finishing up new fuel/oil lines and getting everything mounted up.
Mounted voltage regulator to frame and tapes up all electrical connections for a nice and tidy look.
New fuel lines, regulator, filter and fittings.
I also cleaned up all the VDO sensors and mounted those to the frame via a P-clamp. They were originally dangling and zip tied on. I also bought the block fittings from Rilltech to tap off the oil pressure, and water/oil temp. Oil temp is taken from left side of motor, pressure from right side. Water temp is at the center rear. You can see the water sender faintly here.
Next was cleaning up the wiring. I rewrapped the main wire harness with the correct tape (found the OEM tape car manufacturers use), replaced all switches (rain light, starter, fuel pump) and also added a brake light switch. New power wiring was installed tip to tail and cleaned up all the sensor wiring and fittings. A new Tyco main relay was installed (original was this old boxy looking thing). There was a redudant harness fuse for the fuel pump and cleaned up that. One harness connector was loose and replaced both male/female ends of that connector. All wiring was installed in braided sleeving and tucked away.
New rear calipers and new brake lines all around
Rear end complete
Floors, diffuser and tire kickers install well and look good. New support rods from Stan and it’s all good to go. Jesse's (BRD) pieces are really high quality stuff.
Tire kickers were from Mike @ HRP
New thermal wrap everywhere.
Note catch can in front of spar. I also installed the coolant overflow bottle in the rear where the chain adjuster is
Almost done, getting final details of cable wrapping, routing, and tie downs.
New Sabelts were ordered installed. Next was making a seat. I opted to get the BSCI seat foam. It was my first time doing it and thought it went well. You’ll need at least one person to help you. Once seated, the foam is poured in a bag expands and conforms to your body. Once it’s cured, trimming and wrapping will take a few hours. It was kinda nervous to hold still while the foam cures. You only have one shot at doing it and it's not cheap (~$400). You need to cover up all the pockets in the frame so the foam won't get in all the nooks and crannies (makes removal impossible).
Seat done, head rest done.
At this point the car is complete and sent back to John & Kevin for alignment and squaring everything up.
After I recieved the finished car back, I had signed up for an open track day at Buttonwillow to shake the car up. To my luck, the front right brake caliper was leaking (brake fluid on ground). I ended up ordering a new set of calipers for safe measure.
The shocks are on the car now are the original C2Ps which is a Penske copy. They're kinda cheap and don't belong on the car after all I've done to it. I gave Angelo at ANZE a call and ordered a set of TTX36's. We got all the measurements down and expect shocks to come in 2nd week in Jan.
I also had the BBS cast magnesium wheels shipped out to Framestraight refinish. Turns out all wheels were out of round and deformed from old tire machines clamping on the rim. The wheels are being trued and finished like new. These are in paint now (probably done) and will be shipped to me soon.
Should have the car done (again) in 2 weeks. Need to call for tech inspection to make this thing legal.
What an adventure this was. Although I did spend more money than I had planned/wanted, it was a good learning experience - maybe priceless?
-Arax


 Reply With Quote


 Good luck, go have fun and win some races.


