Results 1 to 11 of 11
  1. #1
    Senior Member
    Join Date
    11.27.10
    Location
    Raleigh NC
    Posts
    426
    Liked: 62

    Default Thoughts on New Seat for RF81 FF

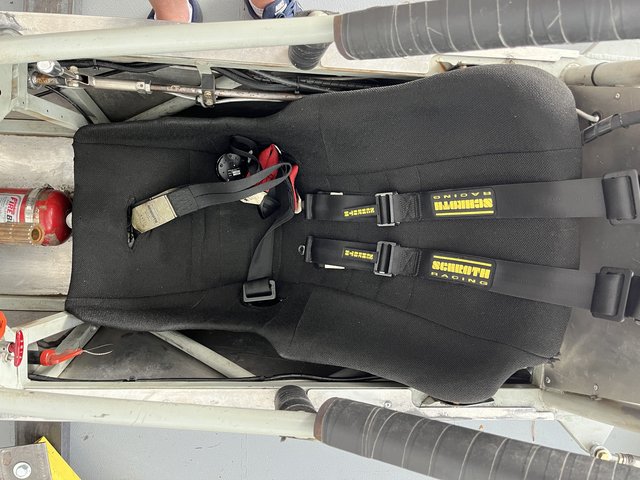
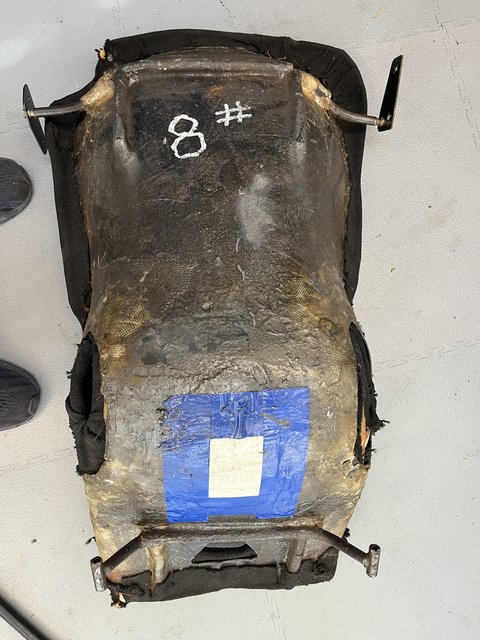
    I want to do something for seating in my RF81 that I run I’ve been running in vintage events the last couple of years. I believe it has the original fiberglass seat in in. A few things about the existing set-up:

    - I set higher than I would like. It doesn’t help that I’m suited up, I’m a bit wider than the seat, and feel like I don’t get quite to the bottom
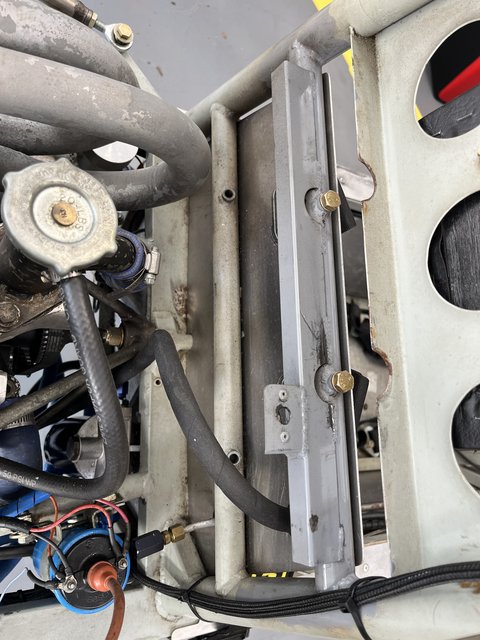
    - It must have a replacement fuel cell can in it, as at some point someone added a side bracket to raise the seat up a bit (see pics). If you take the bracket off and try using the original seat slots the seat hits the fuel cell can
    - The belt bar appears to be a replacement. It’s higher than original with closer than original mounting holes presumably for a HANS
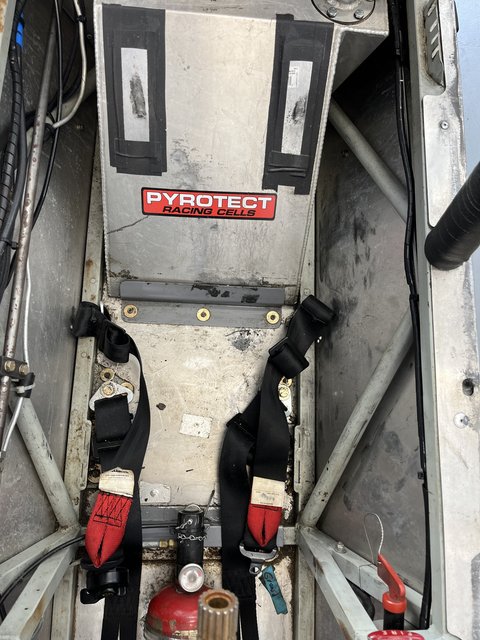
    - If I test sit in the car with my back directly on the cell, it “oil cans” quite a bit, which concerns me a bit in terms of a seat insert
    - The body of the car is about 12” tall on top of the top frame rail

    So a few questions:

    1. What’s the latest thoughts on the various options on the market for the DIY guy?
    2. What size kit do I need? I’m about 5’10” and 183 (but trying to drop a few) lbs
    3. Thoughts on the oil canning issue? Will the seat provide enough “structure” to span the cell so this isn’t an issue?
    4. I’d like the seat to extend up past the top frame rail for more lateral stability. Advice on providing a temp “backer” to contain the seat in this area?

    Open to any advice at this point.

    Thanks!


  2. #2
    Contributing Member Steve Demeter's Avatar
    Join Date
    07.01.01
    Location
    Beavercreek, Ohio 45434
    Posts
    6,355
    Liked: 909

    Default

    fwiw I would start by making up some lightweight panels to close up the "gaps" on either side of the fuel cell. Then I would do the same on the sides to cover the frame members. Then I would make sure that there are no frame members on the bottom of where I am sitting. Then foam a seat in place. Whatever you choose: bead seat, 2 part expanding foam, etc, make sure it "snaps" in place. You will probably have to cut in 2 pieces to get it in and out if it fits properly. cover with duct tape, nomex fabric, the lightest weight fiberglass and resin you can find to suit your preference.

    ALWAYS get a bigger kit than you think you need.

    I would not worry about oil canning the cell, just make sure to leave enough room when you fill it so that it does not force any out the overflow. Every car I have had with the cell set up like yours has done that.

  3. #3
    Senior Member
    Join Date
    11.27.10
    Location
    Raleigh NC
    Posts
    426
    Liked: 62

    Default

    Thanks for the response. I was thinking about adding an additional layer of aluminum sheet goods as an “enclosure” to smooth up the sides before pouring a seat. I’d have to cover all that area with cardboard anyway, and the seat would be cleaner with smooth sides.

    Anyone have any thoughts on the cheap 2 part foam vs. bead vs. that modern 2 part SFI foam that people are now selling?


    Quote Originally Posted by Steve Demeter View Post
    fwiw I would start by making up some lightweight panels to close up the "gaps" on either side of the fuel cell. Then I would do the same on the sides to cover the frame members. Then I would make sure that there are no frame members on the bottom of where I am sitting. Then foam a seat in place. Whatever you choose: bead seat, 2 part expanding foam, etc, make sure it "snaps" in place. You will probably have to cut in 2 pieces to get it in and out if it fits properly. cover with duct tape, nomex fabric, the lightest weight fiberglass and resin you can find to suit your preference.

    ALWAYS get a bigger kit than you think you need.

    I would not worry about oil canning the cell, just make sure to leave enough room when you fill it so that it does not force any out the overflow. Every car I have had with the cell set up like yours has done that.

  4. #4
    Senior Member
    Join Date
    08.29.15
    Location
    Prescott, AZ
    Posts
    447
    Liked: 182

    Default

    Hopefully you will document your progress

  5. #5
    Contributing Member Rick Kirchner's Avatar
    Join Date
    02.24.02
    Location
    Tehachapi, CA
    Posts
    6,503
    Liked: 1474

    Default

    if you dig around you'll probably find my post on a DIY bead seat. You'll have enough materials to make 3.

    You can put a chunk of ensolite foam on the floor and then just build a seat that has back and lateral support. that way, when you step into the car it won't break up the seat over time.

  6. #6
    Contributing Member TimH's Avatar
    Join Date
    12.13.10
    Location
    Tempe, AZ
    Posts
    2,634
    Liked: 1112

    Default

    Quote Originally Posted by wake74 View Post
    Anyone have any thoughts on the cheap 2 part foam vs. bead vs. that modern 2 part SFI foam that people are now selling?
    2-part foam: cheap, a good temporary seat to test your pouring and positioning skills. Turns to powder fairly quickly.

    bead: much safer shock absorption, once. Eventually breaks up a bit.

    SFI foam: maybe even better absorption. Slightly flexible which makes it much easier to take in and out.
    Caldwell D9B - Sold
    Crossle' 30/32/45 Mongrel - Sold
    RF94 Monoshock - here goes nothin'

  7. #7
    Member
    Join Date
    10.08.14
    Location
    Cincinnati, Ohio
    Posts
    55
    Liked: 9

    Default

    Wow, great to see pics of the car! I miss it!

    As far as I know, that seat is an original seat, several people have confirmed it but that does not make it exactly true. The Fuel cell is not original. It was already in the car when I got it. The shape is different and that is why the seat is raised up to clear it. The original cell apparently mounted to the lower frame rails where I mounted the skid plate to. I made those extension plates for the seat mount as it was crudely mounted with some steel strap. There was a small bar with the engine cover dzus plate on it behind the seat that I replaced with the current bar to get the belts in the right place for the HANS device.

    I was always going to do a poured seat over 1" SFI foam for the bottom and back, but seat in it fit me like a glove so I never did. Hope the car is behaving for you!

    Neil

  8. #8
    Senior Member
    Join Date
    01.11.05
    Location
    Zionsville, Indiana
    Posts
    3,169
    Liked: 1397

    Default

    Decades ago, I had a severe crash in a Titan Mk6. I di it at Road Atlanta when there was a turn at the bridge and the back straight was a straight line to the bridge. It was a big impact. After hitting the banck on the left, the car landed in the middle of the track on its side. The suspension was stripped off at the bank.

    I did not fit in the original seat so I had made a formed aluminum seat to replace the original fiber glass seat. Had I not done the aluminum seat, I am certain that I would have broken several ribs as the frame broke at my rib cage. Bottom line, never run a car with a fiberglass seat.

    The foam or bead seats that guys are describing above should be mandatory, the same as roll bars. The risk of injury in a fiberglass seat, as pictured, ain't worth the cost savings.

    Now that is my seat rant.

  9. The following 9 users liked this post:


  10. #9
    Senior Member John LaRue's Avatar
    Join Date
    03.29.01
    Location
    Muncie, Indiana
    Posts
    1,947
    Liked: 976

    Default

    FWIW - Fabricate a proper firewall at the seatback that extends to the body. My preference is either the bead seat material or the BSCI foam seat. With either one you can simply wrap all of your tubes with carboard and then pour the seat. The seat kits will instruct you to lay carboard across the tubes creating a flat surface. The problem with that it the seat is very thin in many places. If you wrap the tubes it will create some clearance so that the seat will slip over but also allow foam to fill those cavities giving you a more robust seat. The BSCI material is flexible so you likely won't need to split the seat to get it out. That is not the case with the bead material.

  11. The following 3 users liked this post:


  12. #10
    Contributing Member
    Join Date
    12.27.08
    Location
    St. Louis, MO
    Posts
    361
    Liked: 98

    Default never run a car with a fiberglass seat

    Great advise. Been there (HP Sprite), broke the ribs.

  13. #11
    Senior Member AlanVDW's Avatar
    Join Date
    05.21.05
    Location
    Ramsey NJ
    Posts
    273
    Liked: 23

    Default Van Diemen Seat

    I have the remnants of an original seat, similar to what you have.

    We had made a bead seat. Fits in well and is removable. Follow the instructions. There is plenty of info available for prep.
    Attached Images Attached Images
    Van Diemen RF 79 #? Van Deimen RF 78 #231

    It's not how fast you go.
    It's how well you go fast.

Thread Information

Users Browsing this Thread

There are currently 1 users browsing this thread. (0 members and 1 guests)

Posting Permissions

  • You may not post new threads
  • You may not post replies
  • You may not post attachments
  • You may not edit your posts
  •  


About Us
Since 2000, ApexSpeed.com has been the go-to place for amateur road racing enthusiasts, bringing together a friendly community of racers, fans, and industry professionals. We're all about creating a space where people can connect, share knowledge, and exchange parts and vehicles, with a focus on specific race cars, classes, series, and events. Our community includes all major purpose-built road racing classes, like the Sports Car Club of America (SCCA) and various pro series across North America and beyond. At ApexSpeed, we're passionate about amateur motorsports and are dedicated to helping our community have fun and grow while creating lasting memories on and off the track.
Social