

Gday guys made the chain tensioner today, has a jack screw arrangement, still have to add a cross member with some bracing for stiffening.
will it work? Comments welcome.


Gday guys made the chain tensioner today, has a jack screw arrangement, still have to add a cross member with some bracing for stiffening.
will it work? Comments welcome.


I've seen one like that work successfully. No failures that I can remember.
I always thought it would be better if could be done in double shear. and try to use it as little as possible. I assume it is there to clear the suspension arm? Or is it also for tensioning the chain?
Racer Russ
Palm Coast, FL
Yes BOTH, clear the lower wishbone and tension the chain.Originally Posted by RussMcB

I agree, double shear would be optimal, but in this case that’s not so convenient. The cantilever set up here is pretty stout and the support axle very beefy. The slotted upright has a compression sleeve that is used to tension the idler sprocket. So I can tighten as much as I like without fear of crushing the slot.
As said earlier I plan to run a cross member to the other sides longeron and then triangulate / brace the slotted upright to it. Should be fine.
I did go and buy a 17 tooth idler gear replacing the 13T pictured, much smoother
Gday guys, Well after doing a little of research I decided to bite the bullet on a cheap Ebay turbo. $185 !
All reports are they work suprisingly well. SurprisinglyWe'll see.
I've made the custom exhaust manifold and mounted the T3/T4 turbo, modified the hot side to take an external waste gate and the V clamp exhaust.
The engine is a GEN 2 Hayabusa, the stock ECU is reported to be fully programmable so I should be able to run a turbo map, fit a larger fuel pump, and higher volume injectors, the head and block will be rasied 2mm to low the CR and take the some extra boost. Otherwise pretty much a stock engine, pistons, rods, valves etc. Oh I will up the clutch springs later on too.
Engine will be on Avgas or E85, E85 looks good for turbo use.
Here are some pic of the set up.

Damn .
You got some serious skills buddy.
ride on .
Can't wait to see (and hear )this thing finished..

Maris Kazia ,CEO
EuroKraft Inc Racing
Circuito do Sol
2014 Radical SR 3 RSX, 2x Tatuus FA 01
BMW HP2 .BMW K1200 R.Porsche 996 Carerra 4s
Yes, this is very cool. I'm looking forward to how you do the air cleaner and intake (and eventually, a video of it running).
I have a gen 2 Hayabusa in a formula car so this is suddenly getting even more interesting!
Good luck with your progress. Glad you are keeping us posted.
Racer Russ
Palm Coast, FL
Hey Russ,
The plan is to make a composite molded plenum chamber perhaps in carbon or not but composite just the same. This will have 4 ports for the Busa throttle bodies to attach. This plenum will be connected to a nice sized induction pipe from a side pod mounted inter cooler. I'm going to make a special head manifold that curves downwards so as to lay the intake plenum chamber down lower so it does not interfere with the height of the rear engine cover. I need to get that Turbo 80's look with low rear deck!
But right now I have enough established on the rear end so I'm moving to the front chassis and starting with the composite body work, then will make the frame and internal structures fit this.
I'll post up so pics of the body work, as soon as I have something to show.
See latest update video posted here: https://www.youtube.com/watch?v=DL30ZxJ15BI
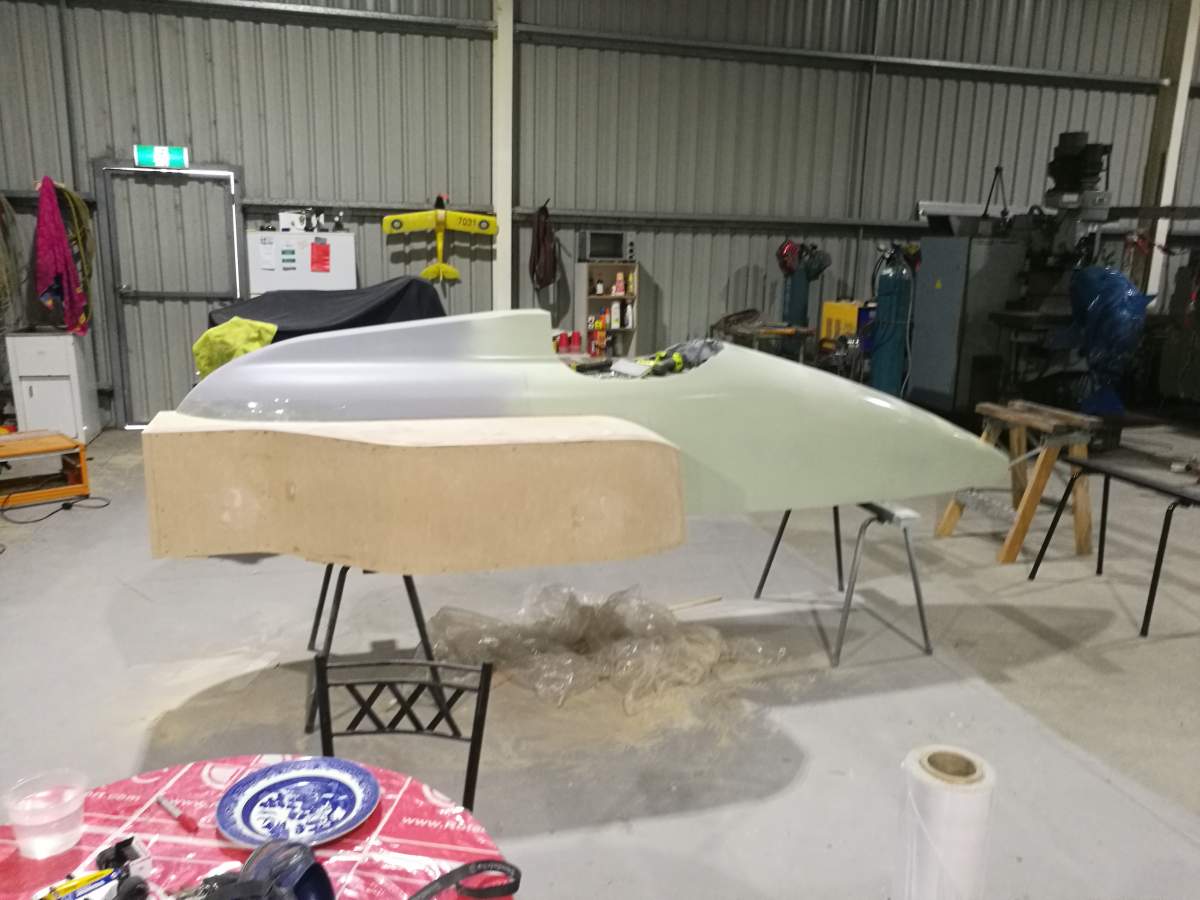
Hey guys, bit of an update on my FB/F1 project. I've decided to shift focus from the rear of the car and now to the front, which will entail the body work this will help determine the boundaries required to establish all the front details, such as suspension, steering, peddle box, seating etc.
So I recently began laying out the center section (tub) of the body work using basic wooden forms, then foam blocks shoved in between the forms, then sanding, fiber glass, Bondo and lot more sanding, A LOT MORE. Next will be the side pods.
These are of course patterns for which I will take various fiber glass moldings from.
This project is just for my technical pleasure it is not designed to meet any specific formula. It is base on the Classic 1987 Williams F1. The rear of the car is about 90% scale, the tub and front section closer to 100%. The Car has the wheel base of an average F3000 and is using the same wheels.
I have a thing for those turbo era F1 cars of the 80's, so fat and stout at the front!
Last edited by palmac; 02.15.20 at 9:59 PM.
We had a local air show here on the weekend so as a part of my display I put the car project out for viewing. I managed to get the center section of the body work pattern looking half decent in primer. Next is the side pod patterns. Then it should look less like a formula Ford and more like an 80's F1 icon.
G'day guys, pattern work on the body continues. Ive just completed the basic shape of the RHS side pod. LHS next.
I'm still yet to add all the corner radii. I'll do this last.
The side pods are a basic shape, unlike the center body, has no compound surfaces, with mostly flat sides made from sheets of MDF and plywood.
The side pods can be removed to allow the molding of the main body (tub) separately, where and if required.
Hi All,
Is there a reason why earlier pics uploaded to this thread are no longer visible?
I thought It may be my browser but seems not.
G'day Guys, I suspect, due to me tidying up my Apex Speed profile, I may have caused some of the earlier images in this thread to vanish!
So for anyone who is interested in those pics here is a link to an an album I just created.
https://www.apexspeed.com/forums/album.php?albumid=562
Cheers Paul
Body work patterns done, ready for composite molding. The TUB is contemplated to be mostly monocoque construction with steel hard points.

There are currently 1 users browsing this thread. (0 members and 1 guests)
 Posting Permissions

 Reply With Quote