Results 1 to 38 of 38
  1. #1
    Member igino's Avatar
    Join Date
    02.18.10
    Location
    Palo Alto, CA
    Posts
    20
    Liked: 0

    Default Bending floor pan

    Folks -

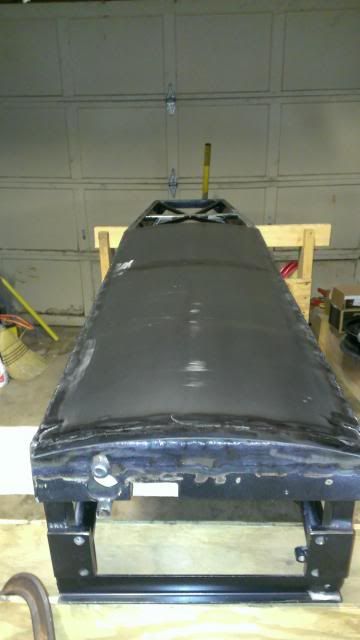
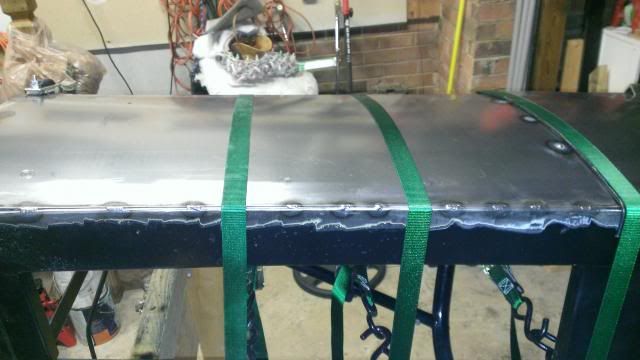
    Need some tips from someone that is pretty handy with sheet aluminum. I want to bend a floor pan for my frame (pictures attached - obviously not finished). It will bend up about 2" on both sides, and attach with dzus tabs. As you can see, the sides of the floor are narrow near the front and then angle out and finally straighten out in the back area. I would really like to avoid cutting and welding it, as I think that will look crap compared to some time invested in shaping it nicely.

    Here's my question - can I massage this in on a large box-pan-brake? A little here, a little there, a little more here, etc etc?

    Any other good ideas you can think of?

    Last resort is to make a male mold and hammer it around that - but with all that effort I might as well make a composite floor. Done that before - more a lengthy than difficult project.

    Also - I should mention that I don't want to leave it flat and attach it on the bottom of the car because I don't like the idea of the dzus heads sticking out the bottom of the car. For several reasons.


    Thanks!
    -Igino

  2. #2
    Senior Member lancer360's Avatar
    Join Date
    12.23.07
    Location
    Charlotte, NC
    Posts
    769
    Liked: 5

    Default

    Why do you want a removable floor pan? A bonded and riveted floor pan adds a large amount of stiffness to the chassis. I would think a floor pan attached with a few Dzus fasteners would also be much more likely to be ripped off if it catches on something like a curb or dirt mound in an off track excursion.
    Chris Ross
    09 NovaKBS F600 #36 Powered by '09 600 Suzuki GSX-R
    "If all else fails, immortality can always be assured by spectacular error." John Kenneth Galbraith

  3. #3
    Member igino's Avatar
    Join Date
    02.18.10
    Location
    Palo Alto, CA
    Posts
    20
    Liked: 0

    Default

    Thanks Chris -

    What do you mean by "bonded"?

    You bring up a good point about the stiffness of the chassis. I was thinking something closer to ~20 dzus tabs. That being said - there would be less slop around the rivets. Good point.

    My main consideration is that on my current car I have often wanted to be able to take off the floor for cleaning, plumbing, modifications to other parts etc. It would be a huge maintenance advantage to be able to easily take off the floor.

    Thanks!!

    -Igino

  4. #4
    Senior Member
    Join Date
    04.30.11
    Location
    NC
    Posts
    1,355
    Liked: 303

    Default

    Igino,

    Search the site for "floorpans" or "bellypans" and you will get plenty of information on installing floorpans. Pay close attention to what Mr. Lathrop has to say. Typically recommended is to bond the pan to the bottom frame rails with a special glue and rivet with a pattern instead of a straight line of rivets. It adds strength to the frame. A "removable" pan may well get removed in an accident, not a desirable outcome.

    Some people (like me) have welded the pan to the frame. Continuous weld around the perimeter and to bulkheads.

    Regards,
    Barry

  5. #5
    Senior Member
    Join Date
    06.07.10
    Location
    Vancouver BC
    Posts
    1,167
    Liked: 49

    Default

    as nice as it would be for maintenance, I'd put some serious thought into making it a bit more permanent.. Bonded (there's a special adhesive for that sort of thing..) and riveted would still be somewhat non-permanent, but infinitely safer!

    I don't think chassis stiffness is a big deal in a zero roll FV, but the less potential for my arse to drag on the asphalt, the better

  6. #6
    Member igino's Avatar
    Join Date
    02.18.10
    Location
    Palo Alto, CA
    Posts
    20
    Liked: 0

    Default

    Guys -

    Thanks a lot for all the info. Definitely opening my eyes to different methods of floor attachment I had no idea about

    Welding the floor seems a bit TOO permanent to me. I'm the kind of guy that really enjoys garage time. I don't think I've gone to two separate races without making a change to the car.

    I'm trying to design this chassis so that even if the floor came completely off I would still be OK - apart from puncture wounds....which is what is giving me pause. This PRC stuff definitely seems advantageous on that front.

    Just thinking out loud - and also thanks for the tips so far.

  7. #7
    Senior Member smsazzy's Avatar
    Join Date
    12.01.05
    Location
    Seattle
    Posts
    444
    Liked: 16

    Default

    Page 310 of the GCR - section F: "Any undertray(s) between the axle center lines shall be rigidly attached to the frame....."

    If I were a tech inspector, I'm not sure I would consider temporary fasteners to mean "rigidly attached". I'm not a tech inspector though. :-)

    I would strongly advise against that though. Rivet the floor at a minimum.

  8. #8
    Senior Member Jean-Sebastien Stoezel's Avatar
    Join Date
    10.01.08
    Location
    Winnipeg, MB
    Posts
    441
    Liked: 15

    Default

    Even though I do not think a removable floor in the cockpit area is the safest solution I do not think it is illegal.

    Several cars have removable floors or undertrays between the axles centerlines, mine has one in the engine bay. It's held in place by dzus fasteners.

    In essence then what is proposed here would seem legal and already applied.

    Quote Originally Posted by smsazzy View Post
    Page 310 of the GCR - section F: "Any undertray(s) between the axle center lines shall be rigidly attached to the frame....."

    If I were a tech inspector, I'm not sure I would consider temporary fasteners to mean "rigidly attached". I'm not a tech inspector though. :-)

    I would strongly advise against that though. Rivet the floor at a minimum.
    ----------------------------
    Jean-Sebastien Stoezel
    Western Canada Motorsport Association (WCMA)
    FV #0

  9. #9
    Member igino's Avatar
    Join Date
    02.18.10
    Location
    Palo Alto, CA
    Posts
    20
    Liked: 0

    Default

    Thinking about this some more - Just for arguements sake, what failure would you expect to see from an adequate number of steel dzus tabs that you would not see from rivets? This is not rhetorical - I have comparatively precious little experience with either compared to the brain trust here

  10. #10
    Senior Member smsazzy's Avatar
    Join Date
    12.01.05
    Location
    Seattle
    Posts
    444
    Liked: 16

    Default

    Quote Originally Posted by jstoezel View Post
    Even though I do not think a removable floor in the cockpit area is the safest solution I do not think it is illegal.

    Several cars have removable floors or undertrays between the axles centerlines, mine has one in the engine bay. It's held in place by dzus fasteners.

    In essence then what is proposed here would seem legal and already applied.
    I'll give you that.

  11. #11
    Senior Member smsazzy's Avatar
    Join Date
    12.01.05
    Location
    Seattle
    Posts
    444
    Liked: 16

    Default

    Quote Originally Posted by igino View Post
    Thinking about this some more - Just for arguements sake, what failure would you expect to see from an adequate number of steel dzus tabs that you would not see from rivets? This is not rhetorical - I have comparatively precious little experience with either compared to the brain trust here
    I believe my floor on the Vortech had about 200+ rivets. I suspect those rivets were about the same diameter as the little spring the dzus grabs onto. So if you put 200 of them on there, sure, I guess the material would be the same.

    However, check with an engineer regarding the forces on the material. I would suspect the rivets in tension woyuld be stronger than the sheering force on the springs. Not to mention that there would be a level of "springy-ness" to those springs; far greater than the springy-ness of the rivets. Whether you could perceive it or not, it is there. That would lead to eventual fatigue.

    Lastly, ultimately, each dzus is held on by what? Two rivets? So let's assume for a moment that the dzus is actually stronger than the rivets. Unless you have a huge abundance of them on the car, you are still ultimately held on my two rivets times the number of dzus fasteners.

    Those would be my thoughts after giving it about 15 seconds to contemplate before my response.

  12. #12
    Senior Member
    Join Date
    04.30.11
    Location
    NC
    Posts
    1,355
    Liked: 303

    Default

    what failure would you expect to see from an adequate number of steel dzus tabs that you would not see from rivets?
    Dzus fasteners are not rigid. By definition there is some play. Because there is some play, in an accident the force is going to get applied to one or a few dzus fasteners, popping them, them load transfers to the next one/group and so on. Until the pan is left flopping around or worse, comes off completely creating a hazard for you and your fellow racers.

    There is probably a reason the pan is not treated as bodywork, and that no one else is doing this...

    Question, is this a FV or a FST? looks like it could go either way.

  13. #13
    Member igino's Avatar
    Join Date
    02.18.10
    Location
    Palo Alto, CA
    Posts
    20
    Liked: 0

    Default

    Quote Originally Posted by BLS View Post
    Dzus fasteners are not rigid. By definition there is some play. Because there is some play, in an accident the force is going to get applied to one or a few dzus fasteners, popping them, them load transfers to the next one/group and so on. Until the pan is left flopping around or worse, comes off completely creating a hazard for you and your fellow racers.

    There is probably a reason the pan is not treated as bodywork, and that no one else is doing this...

    Question, is this a FV or a FST? looks like it could go either way.
    I think you nailed it here, with the force getting applied one by one to the dzus fasteners. Rivets it is! It's an FV.

    Now if someone will PLEASE tell me how to bend this darn floor pan - still can't find info on the bending operation itself =)

  14. #14
    Contributing Member sracing's Avatar
    Join Date
    06.03.01
    Location
    Lexington KY
    Posts
    1,000
    Liked: 50

    Default

    Igino,

    If you are going with the bonding and rivet route, I am not sure why you want to make the bends you describe. It is a fine idea to have a small lip 1/4-1/2" at the front and sides, just to keep things from grabbing the pan between the frame and pan. But, all the bonding and riveting would be on the bottom of the car. Use steel, blind flathead countersunk rivets. Usually every 1" or so, staggered (not in a straight line. There are several good bonding epoxies. (2 part, 3M etc.).

    You can find several different bond type, but get a 2 part that has at least a couple houra of working time. (even 24 hr is fine) Fit your pan to the car with a couple C-clamps. Then start drilling the holes for the rivets. Drill a few at each end and side of the pan. Place the rivets in the holes to hold the pan in place, (or use cleco fateners) while you drill the remaining rivets. When complete with the drilling, countersink the holes, remove the pan, mix the bonding material and spread it on the bottom of the frame. (if the frame is painted you should remove the paint.) The bonding material goes a long way, Then place the pan and start installing the rivets. Hopefully you have an air riveter. Otherwise you will destroy your wrist and hand muscles after the first 50 rivets. .

    You will not lose your pan. If you do go off and drag the pan heavily, you can just inspect and replace rivets as needed. This is the tried and true method. It will be many times stronger than a dzus held pan. And as pointed out here, the dzus' are not firm and will be moving constantly on track and wear will be significant.
    Last edited by sracing; 07.11.13 at 8:23 PM.
    Jim
    859-252-2349 or
    859-339-7425
    http://www.sracing.com

  15. #15
    Member igino's Avatar
    Join Date
    02.18.10
    Location
    Palo Alto, CA
    Posts
    20
    Liked: 0

    Default

    Quote Originally Posted by sracing View Post
    Igino,

    If you are going with the bonding and rivet route, I am not sure why you want to make the bends you describe. It is a fine idea to have a small lip 1/4-1/2" at the front and sides, just to keep things from grabbing the pan between the frame and pan. But, all the bonding and riveting would be on the bottom of the car. Use steel, blind flathead countersunk rivets. Usually every 1" or so, staggered (not in a straight line. There are several good bonding epoxies. (2 part, 3M etc.).

    You can find several different bond type, but get a 2 part that has at least a couple houra of working time. (even 24 hr is fine) Fit your pan to the car with a couple C-clamps. Then start drilling the holes for the rivets. Drill a few at each end and side of the pan. Place the rivets in the holes to hold the pan in place, (or use cleco fateners) while you drill the remaining rivets. When complete with the drilling, countersink the holes, remove the pan, mix the bonding material and spread it on the bottom of the frame. (if the frame is painted you should remove the paint.) The bonding material goes a long way, Then place the pan and start installing the rivets. Hopefully you have an air riveter. Otherwise you will destroy your wrist and hand muscles after the first 50 rivets. .

    You will not lose your pan. If you do go off and drag the pan heavily, you can just inspect and replace rivets as needed. This is the tried and true method. It will be many times stronger than a dzus held pan. And as pointed out here, the dzus' are not firm and will be moving constantly on track and wear will be significant.
    Thanks Jim -

    I CADed the frame and did analysis on it assuming that I would use tabs for the floor pan attachment. I'm a little hesitant to drill ~200 holes into the bottom of my frame now. Carol Smith would lose his sh** if i proposed that.

    I guess i could weld some strips along the bottom of the frame and rivet into those, but now my feet are gonna be scrapping them every time i get in and out of the car.

    That's why I wanted to bend up the sides, and attach them vertically. Incidentally this puts all the rivets in shear strength doubling their strength, which would be nice too.

  16. #16
    Contributing Member sracing's Avatar
    Join Date
    06.03.01
    Location
    Lexington KY
    Posts
    1,000
    Liked: 50

    Default

    Igino. Ok. (But what did C. Smith know about FV ) Yes, riveting on the sides would work (with bonding). But, it's a lot more work..
    Jim
    859-252-2349 or
    859-339-7425
    http://www.sracing.com

  17. #17
    Member igino's Avatar
    Join Date
    02.18.10
    Location
    Palo Alto, CA
    Posts
    20
    Liked: 0

    Default

    Quote Originally Posted by sracing View Post
    Igino. Ok. (But what did C. Smith know about FV ) Yes, riveting on the sides would work (with bonding). But, it's a lot more work..
    HAHAHA - good point. He probably thought it best to leave FV to the experts

    Thanks again for all the help - i'll churn on this and let everyone know what I come up with.

  18. #18
    Senior Member lancer360's Avatar
    Join Date
    12.23.07
    Location
    Charlotte, NC
    Posts
    769
    Liked: 5

    Default

    Many formula cars use a square or rectangular shaped tube for the bottom frame rails to give large amounts of surface area for the bonding and riveting process for a floor pan. I noticed from your photos that the bottom rails are tubular. To get the necessary surface area for the bonding to be effective you would need to roll the floor pan around the sides of the tube like you are discussing or weld on some flat strips. Rolling the floor pan sounds like a lot of work and tough to do it where the floor pan is tight fitting to the shape of the tube so the bonding is effective. That still won't solve the issue of bonding the floor pan to the various cross members. I would look at welding a small strip to each tube to give you the extra bonding surface you need as well as giving you the width to do a staggered hole pattern. The staggered hole pattern will increase the spacing between the rivets that are in the frame tube itself. Read through the couple of lengthy threads on here about doing floor pans.
    Chris Ross
    09 NovaKBS F600 #36 Powered by '09 600 Suzuki GSX-R
    "If all else fails, immortality can always be assured by spectacular error." John Kenneth Galbraith

  19. #19
    Senior Member
    Join Date
    02.22.10
    Location
    Schellsburg, PA
    Posts
    311
    Liked: 115

    Default Floor Pan

    Just my two cents worth. A someone that has had a floor pan roll up like a sardine can I can say the more attachments the better. Regardless of how you attach the floor pan, you need a lip on the front to prevent (in the event of an agricultural experience) the pan from catching in the dirt. I've had more than one engineer tell me that structural rivets are the way to go. If/when you hit something hard the rivets will give way, but will help dissipate the energy. Better the car than your body. The last time I replaced my floor pan there were 188 rivets and I used countersunk rivets. I dragged my frame in the living room (I wasn't married at the time) set the frame on horses drilled, countersunk and de burred to Speed Channel for more than a few nights. An air operated pop rivet gun from Harbor Freight makes short work of the riveting. Bonding is also a smart move. Again, just my 2 cents

  20. #20
    Administrator dc's Avatar
    Join Date
    11.24.00
    Location
    Chicagoland, Illinois
    Posts
    5,526
    Liked: 1417

    Default

    There is a very old but still relevant article written by one of our "no longer racing" forum members on bellypans to be found here. Has proven to be enormously useful in the past to many ApexSpeeders.

  21. #21
    Senior Member
    Join Date
    04.30.11
    Location
    NC
    Posts
    1,355
    Liked: 303

    Default

    I noticed from your photos that the bottom rails are tubular.
    I did not notice... But I see it now.

    Bending a single pan to match the shape of your bottom tubes (since they are not straight) and curve the bend to match the curvature of the tubing is going to be, uh, difficult (IMO).

    Plus, with a single piece pan you will get no bonding (not enough surface anyway) at the cross pieces which also appear round.

    I think it would be near impossible to do that and achieve a tight enough fit for bonding the pan to the tubes. (also, don't forget the 1" max bend in the rules which I believe applies here)

    If it were me, I'd weld it on. My second choice would be to weld 1" flat strips around the inside perimeter to permit the bond and rivet technique.

    A third choice would be to weld steel pans at the front and under your but area, then cover the whole thing with a riveted aluminum pan to close the gaps. (see Mr. Davis for an example http://wedgeracing.com/fv2008/index.htm scroll down near the bottom)

    IF you should decide to weld, go easy. Tack in place, then weld only short sections at a time. I welded no more than 3/8 to 1/2 inch, then moved to the other side, working my way around the car. This minimizes the heat and any warping of the frame. I had zero warping of the frame when I did mine.

    A few pics,
    First is finished pan (curved 1". 0.063 CM steel)
    Second shows the pan held down with nylon straps which did not get hot enough to melt as I stiched along
    Third is just a close up of the weld (notice the paint which did not get hot enough to bubble)


  22. #22
    Senior Member
    Join Date
    08.18.02
    Location
    Indy, IN
    Posts
    6,285
    Liked: 1878

    Default

    Quote Originally Posted by igino View Post
    Thanks Jim -

    I CADed the frame and did analysis on it assuming that I would use tabs for the floor pan attachment. I'm a little hesitant to drill ~200 holes into the bottom of my frame now. Carol Smith would lose his sh** if i proposed that.

    I guess I could weld some strips along the bottom of the frame and rivet into those, but now my feet are gonna be scrapping them every time i get in and out of the car.

    That's why I wanted to bend up the sides, and attach them vertically. Incidentally this puts all the rivets in shear strength doubling their strength, which would be nice too.
    Your proposed attachment method is not legal - the fasteners on the sides are more that 1 inch above the lowest point of the floorpan ( rule FCS 9.1.1.8.F.)

    Every FF, FC and FB out there has their pan riveted and bonded to the square bottom tubes ( at least the intelligent manufacturers), and some have started adding in the 1" strips to the inside edge of every bottom tube so as to add extra bonding area. ( and then, some guys have welded their pans into place). This not only adds a lot of torsional stiffness, but it also massively increases safety. The real strength and safety is in the bonding, not the rivets.

    Attaching to the side in the manner you describe will not only be a nightmare ( to get the pan curled correctly to fit nicely around the lower tubes and up the sides), but will be a huge decrease in the safety compared to a bonded pan.

    Forget what you originally thought of doing and do the job correctly. Read AND FOLLOW the directions that Tom Johnson wrote up that Doug Carter referenced for you.

  23. #23
    Member igino's Avatar
    Join Date
    02.18.10
    Location
    Palo Alto, CA
    Posts
    20
    Liked: 0

    Default

    Quote Originally Posted by BLS View Post

    Bending a single pan to match the shape of your bottom tubes (since they are not straight) and curve the bend to match the curvature of the tubing is going to be, uh, difficult (IMO).

    Well, yeah. That was why I originally posted.

    Prolly just going to weld it at this point. Then if something goes wrong down the line change all the bottom tubes to square tube. Or I'll just do that right now. Not sure.

    Thanks for the photos.

  24. #24
    Senior Member
    Join Date
    04.30.11
    Location
    NC
    Posts
    1,355
    Liked: 303

    Default

    Thanks for the photos.
    the joys of working late... You're welcome.

    The main reason for posting the photo's was to show you that the welding can be done without excessively heating the tubing. I would finish all the tubing welds first, the weld on the pan. Where I think you *might* have an issue is welding the round cross members as it is sometimes difficult to get into a confined space and you have little to weld to. It took me most of a day to weld the pan, but I'm a slow welder.

    My opinion, I would leave the round tubing at this point, drill 1/4 inch holes about an inch apart in the pan where the cross members are located and do rosette welds there. Or if you're really good maybe you can get the pan welded to the members OK. The hardest part for me was welding the cross members. They are curved and the welds had to be done on the inside. I had a hard time getting close enough through all the tubing to "see" the weld well. I can weld pretty good when I can see (I use reading glasses for this). Next time around I'll have to have something that magnify's at those distances.

  25. #25
    Senior Member AVR_Shane's Avatar
    Join Date
    11.27.10
    Location
    Barrie, Ontario, Canada
    Posts
    675
    Liked: 200

    Default

    Quote Originally Posted by igino View Post
    Carol Smith would lose his sh** if i proposed that.
    Carol Smith also said that Formula Vee's are not real race cars...I think a few people in this forum might disagree with that statement!

    The only reason you might not want to weld a steel floor to the frame is because of weight. Depending on the surface area of the floor, you would be adding significant weight compared to aluminum. You can use a high strength aluminum (6061 would do). If bonded properly with stainless steel rivets, it would be plenty strong enough.
    Shane Viccary
    #27 Citation-Zink Z-16

  26. #26
    Contributing Member
    Join Date
    09.25.07
    Location
    Chicago
    Posts
    207
    Liked: 15

    Default

    I replaced mine a few years ago and the Clecos were worth every penny. You can temporarily install the pan and verify accuracy and alignments.

    Additionally I would encourage you not to dzus fasten the floor pan.... if that was a good idea you would see it on all our cars.

    As for the bends, you can purchase a small brake at Harbor Freight to do it, worked for me.

  27. #27
    Contributing Member
    Join Date
    12.10.02
    Location
    New Jersey
    Posts
    1,092
    Liked: 20

    Default

    It may even work to do the rosette welds mentioned on all the tubes, but leave the outside 1/2" long. Then after welding them, you could work your way around "rolling up' the sides with a hammer, and clamping them for stitch welds. Either that, or bend a 1/2" 90° flange first, which you can then stitch weld on the sides, and rosette on the bottom.

  28. #28
    Senior Member Jphoenix's Avatar
    Join Date
    01.24.10
    Location
    Seattle, Washington
    Posts
    148
    Liked: 59

    Default

    If you don't want to buy an air-driven pop rivet gun, I used one of these to install high strength pop-rivets (Cherry-Max fasteners in the fuselage pan of a sailplane) and it worked quite well:

    http://www.amazon.com/automotive/dp/B003BZQ6KY

    Cherry-Max have a high stem-pull force with a steel locking collar. Compared to normal pop-rivets, they take more force to set and can strain the puller. I was able to pull up to 5/32" dia. Cherry Max, at least 500 of various 1/8" to 5/32" Cherry's and no sign of the unit failing or slipping. Works very well for normal aluminum or steel pop-rivets. Never used a hand puller again.

    Also, I agree with Cendiv, a bucket of cleco's are worth their weight in gold! Some of my cleco collection are 30 years old. My favorites are cleco clamps:

    http://www.amazon.com/Allstar-Perfor...ds=cleco+clamp


    Jim

  29. #29
    Senior Member Jphoenix's Avatar
    Join Date
    01.24.10
    Location
    Seattle, Washington
    Posts
    148
    Liked: 59

    Default

    Another clever trick when using epoxy-based adhesives for bonding, don't use acetone or MEK to clean up the drips and other sticky mess - before the epoxy sets, use vinegar as a solvent to clean any epoxy residue or drips, you will be surprised at how much better it works than checmical cleaners.

    Works for resin or hardener drips and spills as wells as the combined epoxy - after you finish gluing, dampen a rag in vinegar and clean up the drips, just don't let vinegar run into the bond line or it will degrade the performance of the adhesive bond.

    Jim

  30. #30
    Member
    Join Date
    02.17.09
    Location
    Syracuse, NY
    Posts
    91
    Liked: 4

    Default

    Quote Originally Posted by AVR_Shane View Post
    The only reason you might not want to weld a steel floor to the frame is because of weight.
    Conversely, part of the reason you may want a steel floor is because of the weight. If you're going to ballasting anyways, a steel floor pan is as low as you can get the weight, and does give a margin of safety over aluminum.

    Fortunately I enjoy my doughnuts enough that I don't need to worry much about ballast, and it's a pretty easy choice to go aluminum for me.

  31. #31
    Senior Member AVR_Shane's Avatar
    Join Date
    11.27.10
    Location
    Barrie, Ontario, Canada
    Posts
    675
    Liked: 200

    Default

    Quote Originally Posted by Scootin159 View Post
    Conversely, part of the reason you may want a steel floor is because of the weight. If you're going to ballasting anyways, a steel floor pan is as low as you can get the weight, and does give a margin of safety over aluminum.

    Fortunately I enjoy my doughnuts enough that I don't need to worry much about ballast, and it's a pretty easy choice to go aluminum for me.
    That's true, but it also possibly limits the different types of drivers that could drive the car in the future.

    If you are 150lb and plan to be the only driver in the car for a long time, have at her and weld it up!
    Shane Viccary
    #27 Citation-Zink Z-16

  32. #32
    Senior Member
    Join Date
    04.30.11
    Location
    NC
    Posts
    1,355
    Liked: 303

    Default

    The main reason for using steel in this case is to weld it. If only rivets/bonding are going to be used and weight is an issue then aluminum might be a better choice. In my case, the steel pan ends under the fuel cell and is al the rest of the way back. The difference in weight of 63 thou steel and 90 thou al was approximately 7 pounds as I recall. A 2 pound battery makes up for that over the original 11 pound one.

    If I were going al and rivets I would definitely weld the flat strips to the inside perimeter. I would not trust rivets only against the bottom of the round tubing and you really need the strips to bond (the round tube is only going to allow a straight rivet line and no bonding). Or I would use the Stevan Davis method in the link I referenced earlier, short pieces of steel welded in and a thin aluminum sheet to serve as a non structural cover.

    Just my opinion. By the way, congrats on building your own car. I'm sure you'll figure out what works best for you.

  33. #33
    Senior Member Doug FST 5's Avatar
    Join Date
    11.11.08
    Location
    Cincinnasti
    Posts
    378
    Liked: 58

    Default bonded / riveted is a must

    Even with bonding and riveting you can lose the belly pan in a potentially dangerous way. In my years in FV I saw this happen twice. Once was an FV hitting a wall at Mosport. The frame racked and sheared the dozens of rivets. The other was a belly pan edge catching the ground after a flying FV dug in after a wild ride starting at the kink at Nelson.

    Doug FST 5

    ....yes the Nelson incident was mine...

  34. #34
    Member igino's Avatar
    Join Date
    02.18.10
    Location
    Palo Alto, CA
    Posts
    20
    Liked: 0

    Default

    Quote Originally Posted by Doug FST 5 View Post
    Even with bonding and riveting you can lose the belly pan in a potentially dangerous way. In my years in FV I saw this happen twice. Once was an FV hitting a wall at Mosport. The frame racked and sheared the dozens of rivets. The other was a belly pan edge catching the ground after a flying FV dug in after a wild ride starting at the kink at Nelson.

    Doug FST 5

    ....yes the Nelson incident was mine...
    holy moly! Do you have pictures of the damage??

  35. #35
    Senior Member Doug FST 5's Avatar
    Join Date
    11.11.08
    Location
    Cincinnasti
    Posts
    378
    Liked: 58

    Default no photos

    If we had photos I'm not sure where they are anymore - it happened 10-15 years ago. The car dug in while landing going backwards. The floor was ripped off to about where my knees were. My straining in the belts kept me from having a grass stain on my behind. Everything held in by the floor came out (fuel cell, fire bottle, battery). It was a mess - had it back in one piece two weeks later for the next National in the series of course.....


    Doug FST 5

  36. #36
    Contributing Member problemchild's Avatar
    Join Date
    10.22.02
    Location
    Ransomville, NY
    Posts
    5,731
    Liked: 4353

    Default

    Considering your rounded rails, welding the 1" strips to the inside of the rails will give you the flat surface you require for bonding and riveting. I see that, and welding a steel floor directly to the rails, as your viable options.

    Large sheet metal shops can use brakes and rollers to make almost any shaped floor you would want. The cost of the material would be a fraction of the total cost however.
    Greg Rice, RICERACEPREP.com
    F1600 Arrive-N-Drive for FRP and SCCA, FC SCCA also. Including Runoffs
    2020 & 2022 F1600 Champion, 2020 SCCA FF Champion, 2021 SCCA FC Champion,
    2016 F2000 Champion, Follow RiceRacePrep on Instagram.

  37. #37
    Grand Pooh Bah Purple Frog's Avatar
    Join Date
    04.03.01
    Location
    Havana, Fl, USA
    Posts
    10,777
    Liked: 3787

    Default

    Adequate floor fastening is a nice thing...
    Last edited by Purple Frog; 09.20.13 at 12:52 AM.

  38. #38
    Junior Member
    Join Date
    07.28.13
    Location
    monterey ca
    Posts
    1
    Liked: 0

    Default floor pan

    Igino, its Slim, call me about this.

Thread Information

Users Browsing this Thread

There are currently 1 users browsing this thread. (0 members and 1 guests)

Posting Permissions

  • You may not post new threads
  • You may not post replies
  • You may not post attachments
  • You may not edit your posts
  •  


About Us
Since 2000, ApexSpeed.com has been the go-to place for amateur road racing enthusiasts, bringing together a friendly community of racers, fans, and industry professionals. We're all about creating a space where people can connect, share knowledge, and exchange parts and vehicles, with a focus on specific race cars, classes, series, and events. Our community includes all major purpose-built road racing classes, like the Sports Car Club of America (SCCA) and various pro series across North America and beyond. At ApexSpeed, we're passionate about amateur motorsports and are dedicated to helping our community have fun and grow while creating lasting memories on and off the track.
Social