Is there a step by step article..preferably with pics..of changing the ratios of a Hewland MK9?..I am in the bush a bit so not a lot of locals are knowledgable.
Thanks
R


Is there a step by step article..preferably with pics..of changing the ratios of a Hewland MK9?..I am in the bush a bit so not a lot of locals are knowledgable.
Thanks
R

Hey, Bud;
A must is the shop manual from Taylor Race Engineering: http://www.taylor-race.com, Item INV-020010
Iverson
Last edited by Rick Iverson; 05.06.10 at 1:32 PM.

the hewland web site has a downloadable manual for the MK 9
just google hewland and poke around.
there are a couple of 'tricks' to help when disassembling and putting back together
when taking apart, use a tube approx 1" in dia x 15" long to thread thru the gears on the top shaft to keep them from just falling into a pile as they slide out. also helps to keep the spacers in the correct order.
when re-assembly, the last half inch needs a trick: hold the left wheel in position and rotate the right one back and forth (just a little) and the last one will click in.
there have been several threads on gear changing techniques posted here in the past. go ahead and search the forums to find them.
the first couple of time, it will take a while and appears extremely confusing. once you have done it, it gets easier. (like a lot of things in life)
Thanks Rick and Rick,
Modo sent me the link to Hewland but I had that...sitting and studying it now..I sort of get it...but those small tips are worth their weight in gold...I think I just better do a trip to my mates place 3 hours away and sitdown and do it with him giving instructions and me taking lots of pics...he says when you have done it once...its easy...he also mentioned the last half inch as well and the jiggerling of the wheels to get it to mesh. Just thought someone might have done a pictorial of changing..thats all....then comes the next dumb question..having never had one..how do you change the oil on a dry sump system?..I am sure he will sort that out for me as well...Lol!..First open wheeler...learning new things every day!...(This isnt a hobby..its an ADVENTURE!)..They are about the only 2 things that have me tentative...the wheel alignment,, corner weights..suspension set up etc are no dramas..helped do that for my old boss with his F5000....
R

send me your e mail and I will forward all I have including pictures. File is too big to upload
Originally Posted by Rick Iverson

My mistake. This photo is for the LD-200. However, it is updated.
Last edited by Rick Iverson; 05.06.10 at 9:49 AM.
haha!...glad I am not the only one that stuffs up!
R

In the early days, the Mk8/9 gear sets, had a flat side and a tapered side. The closeup Hewland drawing, showed those tapered sides, in a particular direction when installed properly. Now, the gears appear to have both sides tapered. Because in the early days, the ratio numbers were on the tapered side, I use the side with the ratio numbers as the tapered side. This way, the two gears of the set, always run together the same way.
Thanks Keith....I think you just did my head in...I am going to bed..its 1.00am in OZ.....
R

FWIW I am not familiar with the Mark 9 gearbox, so the advice given by the gentlemen above is priceless. However To lessen your apprehension I will share with you first time I had to change gears in our LD200, I was just as concerned as you are in not screwing everything up. RELAX read the Hewland manual [I think I red it 1/2 doz. times] take your time and you will find that it is NOT as dificult as you anticipate. I downloaded the manual from their website, the manual is very detailed. the drawing are very informative. I know because as I was extracting the gears I forgot to use anything to keep the upper gears from falling into a pile and they did!, I was p***** and thought for sure I would not be able to figure out how to reassemle the pile in front of me. I HAD TO RELY on the manual and drawing to reassemble the gear box. After many rereads I found the instructions were spot on and the gear box assy. was easier than I thought it would be. I even had all gears, spacers in properly and the gearbox worked perfecty. So do not Panic, and enjoy tthe learning experience, Regards Ernie
But NEVER, and I mean NEVER have 3-5 beers before attempting a gear change.

and leave your hammer in the tool box! Wrong way to finish up (I've seen that tried too many times).
some guys I know have just run the engine until a rod cap comes out the bottom of rhe sump pan, the oil drains really quickly, then. but there are expensive drawbacks with this method.
it kinda depends on access to the tank fittings.
some DS tanks have a drain plug on the bottom or on the bottom of the side. if you have a removeable floorpan, it helps. others have drilled a 1" hole in the pan to get to the plug on the bottom.
others can disconnect the supply line at the bottom of the tank (but disconnect it on the far end of the line, away from the tank)
both of these methods require that you run the engine for a short time in order to get the oil that is in the pan back into the DS tank where it normally resides.
just picture it in your mind's eye and a solution will appear.

I would love to see a video on youtube of the gear change to help visualize the instructions.
I need to change from RA to the BIR short track, so I'll tape and post it. But again, my gearbox is an LD-200.
Iverson
Aha! Found a pictorial from Holland...Perfect!...That does look easy actually..
I will put it up.
R

It is pretty easy with the manual by your side. Once you get the gear assembly out, the BIGGEST help will be VERY carefully unstacking the pieces and lay them on the bench in an ORDER so you know what goes back on next.
During reassembly, make sure the shift forks are properly in place AND DO NOT put the last (reverse) gear on backwards. Not too difficult to do and if you do it, you won't have reverse.
Before you give yourself a hernia REMEMBER the lower shaft nut is right hand thread and upper is left hand. Forget and you'll end up in the emergancy room with a pulled groin.
Have a big torque wrench that works in both directions. Pinion shaft gets 120 Ft.Lb. and the Layshaft is 70 Ft. Lb. on the nuts.
Get a nice coating of Hylomar sealant on the mating face and make sure you don't have voids in the bead.
Not sure what you found for a manual but here's the HEWLAND version for the MK 8/9:
http://www.hewland-engineering.com/drawings/mk8-9.pdf
CREW for Jeff 89 Reynard or Flag & Comm.
Actually its in Swedish...Thanks to Henrik and Apex speed....now with pics and the english instructions I feel more comfortable.
R
http://www.classicformula.se/downloads/car/mk8.pdf
My trick is to cut the big nuts in a lathe so that they are at the right torque as soon as the cotter pin hole is in the right place. You can lap them in with sandpaper as well. makes assembly a breeze when in a hurry!
Brian
Yes, I didn't want to bring that PITA up. When we first took ours apart, didn't check where they were torque'd too but they were REALLY, REALLY on there!
Sure enough when we put it back together and 'properly' torqued the nuts, the cotter pins were so far off it wasn't even humorous! Just went the over-torque route and have never set them up properly... sigh
CREW for Jeff 89 Reynard or Flag & Comm.
Please do! I have 20+ years with a MK9, none with an LD200
TIA

I made a "stand" to hold the gear stacks in proper order when cleaning the bearing carrier.
Piece of 3/4" plywood about 12" square.
then get the largest diameter wooden dowels you can find. cut 2 pieces about 12" long and screw them to the plywood standing up with the screw through the plywood.
I also wrote pinion and layshaft next to them just to make double sure

I have had a few freinds show me how to do this. it was intimidating at first, but now its just another dirty job.
the stand is a good thing to get, make one like steve says, or better yet , buy the one that pegasus auto racing sells. it catches all the oil that drips everywhere.
also leave the nut on the layshaft until after you pull the case apart, it keeps everything from falling everywhere.
use one hand under the layshaft stack of gears while pulling the case apart, this stops the gears from falling off( i learned this one the hard way).
the last 1/2" for completion is a pain in the butt. i got a snap on hose pick that has just the correct angle to rotate the last gear to get it lined up really easily. you just reach it in there and push the case together while rotaing the last gear.
great advice on keeping a clean towel on the ground and keeping everything in order when you remove the gears. it makes it easy.
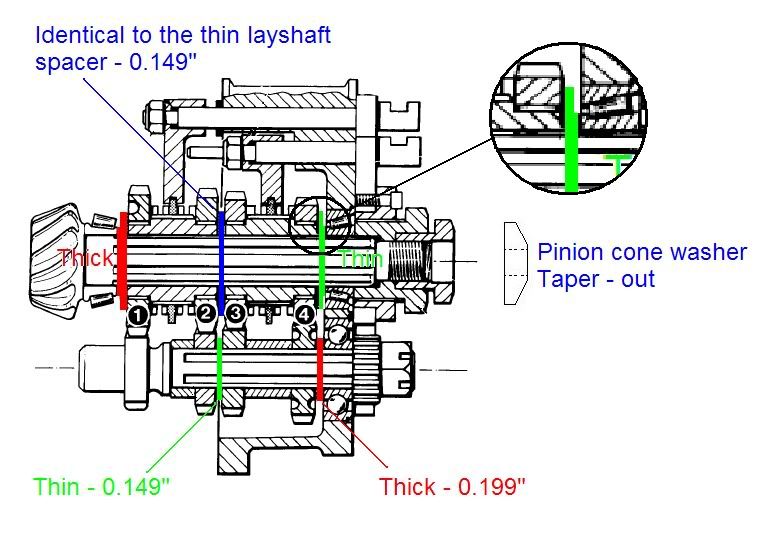
when all else fails i use my photoshopped picture that i made when this was still very new to me.
it has all the info that i need on it.
hope this helps someone.
josh
Froggy changed a set of gears for me once at Mosport and never let go of his Martini. And this was after sunset, in the dark, no lights.
But did the box work afterwards??
In case someone still needs good Youtube tutorial:
https://www.youtube.com/watch?v=7V09...=GrahameBurton

Gee it’s still getting views. When do I start to get paid by YouTube??
And I thank you very much for this video as we've used it many times in our learning curve every time we swap gears in our RF84 !
When I went to the 50th Anniversary Race at Road America, I was amazed to see some guys doing a ratio change and looking at the video at the same time. They picked my accent, and wanted to know if I knew that guy.
I’m glad it’s been so useful to many here. I’ve certainly received a lot of good advice here in the past 22 years I’ve been a member.
There are currently 1 users browsing this thread. (0 members and 1 guests)
 Posting Permissions

 Reply With Quote