Page 2 of 4 FirstFirst 1234 LastLast
Results 41 to 80 of 124
  1. #41
    Senior Member joshuagore's Avatar
    Join Date
    07.21.09
    Location
    Volo/Round Lake
    Posts
    129
    Liked: 0

    Default

    Fishmouthed the 2 upper tubes running from the kink in the rear hoop to the kink in the middle(knee) hoop. They turned out great, but only after a bad welding experience toasted a few inches of tube. I then decided it was time to buy the right tig for the job so craigslist will be my friend.
    I started to also fit the tubes running from the top of the bar(not top but somewhere between the top and 6in from it) to the middle of the upper rails. I quickly realized that I needed my indexing vise to get the proper notch without grinding. This will have to wait until tomorrow.

    It is really easy to try and do to much to fast, and progress at a rate beyond my skill level. I realized that although some people can do this work fast, I have to take it slow. I will get better/faster, but for now quality will have to take time.

    These complex compound fismouth cuts get confusing, and I really am trying to do it without any secondary finishing beyond the cut in the mill. I know many people hand fit these, but why give myself more of a welding challenge than I need to.

    So anyone in chicago have a steal on a solid tig?

    Josh

  2. #42
    Banned
    Join Date
    02.04.02
    Location
    California
    Posts
    6,399
    Liked: 1116

    Default

    Given the tools at your disposal this may not be required....but none the less somebody might find it usefull.

    http://metalgeek.com/static/cope_custom.pcgi

  3. #43
    Senior Member joshuagore's Avatar
    Join Date
    07.21.09
    Location
    Volo/Round Lake
    Posts
    129
    Liked: 0

    Default

    Quote Originally Posted by Quickshoe View Post
    Given the tools at your disposal this may not be required....but none the less somebody might find it usefull.

    http://metalgeek.com/static/cope_custom.pcgi

    Great link thanks.

    I started to tig things together. I also for the first time found out the idea of a root pass can be very helpful. Here are the results, and a root pass pre wire.

    Josh


  4. #44
    Senior Member joshuagore's Avatar
    Join Date
    07.21.09
    Location
    Volo/Round Lake
    Posts
    129
    Liked: 0

    Default

    It has been a long time since my last update... It became clear to me that although my small high precision tig was not warning of being to hot... the torch told otherwise.

    I have since purchased a Linde/L-tec/hsab 250hf/square wave which is now taking over all my fabrications. It has proven in its limited use to be much more consistent at the amperage and duty cycle required for this type of work. I decided to hold off on welding any more until I had done an hours worth of practice daily for an entire week. I experimented with settings, gas lens torches, gas pressure, and amperage. I have found the settings which i'm sure is of no surprise to you guys to be almost exactly what Finch defines for between .090-.1 thick wall cromo. My welder doesn't have an amperage gauge just a knob but from what I have seen is slightly under rated. I am at 75 amps on the dial, but at 3/4 on the pedal am experiencing just the right amount of heat to not rush me. I am excited about my progress and have more tubes fitted and 2 more tacked in.

    I will not rush to get anything done for some deadline. I will take my time, and if I miss the school there will always be another either mid season out of my region, or in August in my region. If it comes to it, I will finish the car, and take it to a few track sessions to even further sort it out.

    I am learning a lot, and want to thank everyone for there wise words, and encouragement.

    Thanks,
    Josh

    New welder.


    New torch... I am a novice, but can tell you that the weldtec stuff seems very high quality.

  5. #45
    Contributing Member provamo's Avatar
    Join Date
    05.24.04
    Location
    Amherst, New York but i left my heart in San Francisco
    Posts
    2,650
    Liked: 292

    Default heads up

    secure your new machine to that rolling platform

    i think i generally use a post flow of 15 seconds

    as for amperage i use something analogous to the metal thickness: like 70 amp for .070 sheet, 125 for .125 tube etc. but this varies with the masses involved etc.

    do not rush

    have fun

  6. #46
    Senior Member edschubert's Avatar
    Join Date
    08.30.06
    Location
    Williamsburg, VA.
    Posts
    108
    Liked: 0

    Default steering box

    I have a Citation and "relocated" my steering box. It was a fairly simple process. I can't figure out how to attach pictures. I can eamil them to you if you would like. Let me know or maybe you can tell how to attached pictures.

    edschubert@live.com
    Ed Schubert
    edschubert@live.com
    757-692-1181

  7. #47
    Senior Member joshuagore's Avatar
    Join Date
    07.21.09
    Location
    Volo/Round Lake
    Posts
    129
    Liked: 0

    Default

    Here is where I am at now.


  8. #48
    Contributing Member
    Join Date
    10.31.02
    Location
    mpls
    Posts
    168
    Liked: 4

    Default

    Just a suggestion, sit in the car. Having owned a Lynx, those lower support bars may need to have a bend in them. You may have a shoulder or arm problem.

    Dave

  9. #49
    Senior Member joshuagore's Avatar
    Join Date
    07.21.09
    Location
    Volo/Round Lake
    Posts
    129
    Liked: 0

    Default

    A month back I posted this up for sale.... I was frustrated with the fact that time got away from me and I was unable to finish the car and or go racing. I had a solid buyer lined up but they never showed. I looked at the car and could see it coming together, so I started that night on the rest of the car. Spent the past 2 weeks taking it from cage to near completion. Now for homoligation paperwork Also anyone know someone selling decent take offs in the midwest?
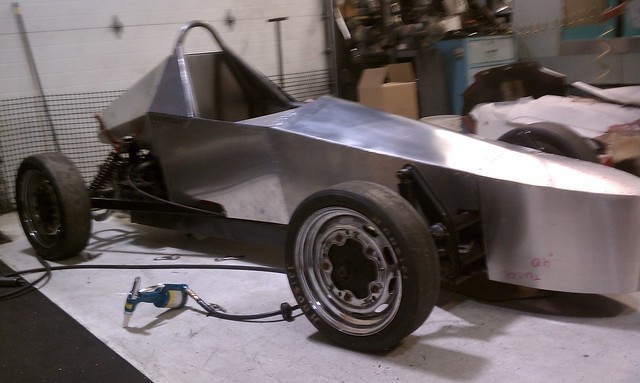
    Anyone have any good pictures of how there seats are layed out. I was thinking of just doing a foam pour over my cell, but I am not happy with the angle of my cell, so considered bringing the seat up slightly in the back at the top.


  10. #50
    Senior Member
    Join Date
    04.22.08
    Location
    sacramento, ca
    Posts
    790
    Liked: 72

    Default

    Do yourself a favor and have someone put a straight edge over your head from rear to front hoop while you are in the seat. The front hoop looks a bit low. The straight edge must clear your helmet.
    The above post is for reference only and your results may vary. This post is not intended to reflect the views and opinions of SCCA and should not be considered an analysis or opinion of the rules written in the GCR. thanks, Brian McCarthy, BOD area 9.

  11. #51
    Senior Member joshuagore's Avatar
    Join Date
    07.21.09
    Location
    Volo/Round Lake
    Posts
    129
    Liked: 0

    Default

    Quote Originally Posted by budawe View Post
    Do yourself a favor and have someone put a straight edge over your head from rear to front hoop while you are in the seat. The front hoop looks a bit low. The straight edge must clear your helmet.
    The rear hoop is just REAL tall. I will check again ow that its all being put together, but when we first measured there was enough room to bring the dog with.

  12. #52
    Grand Pooh Bah Purple Frog's Avatar
    Join Date
    04.03.01
    Location
    Havana, Fl, USA
    Posts
    10,777
    Liked: 3787

    Default

    I ran with a aluminum body in the 70's. Make sure you have it fastened well to the chassis. In case of an incident you don't want it to act like Edward Scissorhands.

    Read the GCR in FV section, in the area under suspension, around paragraph 11, about what can and can't be ahead of the front torsion bar tubes. Yon need good support for that nose, but you need to craft it legally.

    You appear good enough with sheet metal to be able to fab a seat back at the angle you are comfortable, then pour a foam seat in front of that. You can use multiple layers of cardboard to dummy up the seat back til you get it where you like.

  13. #53
    Senior Member joshuagore's Avatar
    Join Date
    07.21.09
    Location
    Volo/Round Lake
    Posts
    129
    Liked: 0

    Default

    [QUOTE=Purple Frog;288912]I ran with a aluminum body in the 70's. Make sure you have it fastened well to the chassis. In case of an incident you don't want it to act like Edward Scissorhands.

    Read the GCR in FV section, in the area under suspension, around paragraph 11, about what can and can't be ahead of the front torsion bar tubes. Yon need good support for that nose, but you need to craft it legally.

    You appear good enough with sheet metal to be able to fab a seat back at the angle you are comfortable, then pour a foam seat in front of that. You can use multiple layers of cardboard to dummy up the seat back til you get it where you like.
    [/QUOTE

    Mounted to the front of the torsion bar is a metal tube bracket with two V's mounting to the 'stock' mounting points with a bar going between it. The nose slides over that bar, and inside the nose an vertical sheet metal brace slides over that bar. The nose is then attached with two dsuz fasteners on the top and there will be two more on the sides. Everything on the car is 063 6061, except for the vertical walls of the outer edge of the nose which is t6 040. I will re read that section to ensure my legality.

    I will likely be going for my scca license but racing mcscc as the car will likely be slow. The car has a lot of love and time into it, but its more about fun and reliability at this point my racing career Time to get away from computer/ps3 based sims and get back onto the track.

    The rear seat will be fabricated exactly as you described. it will be quick release and attach at cage, and the cage below the harness bar, and at the frame lower crossmember directly below the roll hoop. It will hide the battery unless I decide to mount the battery on the right frame rail. If the battery is below or at the base of my seat it will keep me lifted off the floor by an inch or two which I am not thrilled about.

    Thanks again to everyone for all the help. This will officially be the most budget car I have ever been involved with, but no sense in not doing it safe and reliable. I don't want to spec the monies involved but lets just say you couldn't buy the cell, fire system, and gauges for what I paid for the car, trailer, and spare trans/engine.

    Very happy to be so close to getting a good track setup day in. Weeks away if the weather plays nice.

    Josh

  14. #54
    Senior Member joshuagore's Avatar
    Join Date
    07.21.09
    Location
    Volo/Round Lake
    Posts
    129
    Liked: 0

    Default

    I modeled the nose length after the one that came on the car... and it protrudes further than 10in but it falls under bodywork. The brace that holds the bodywork is less than 8in out. I will likely throw a garbage bag in the nose and dumb some foam in to help in the event of impact. The nose bottom will be trimmed as to not project below the base of the car, I left it long to trim later. So far I am legit.

  15. #55
    Senior Member edschubert's Avatar
    Join Date
    08.30.06
    Location
    Williamsburg, VA.
    Posts
    108
    Liked: 0

    Default

    What did you do with your steering box and master cyl's? I'm not sure if I ever emailed you what I did. Here are pictures. I am not sure if I attached these right. If you would like I can email them to you.

    Attachment 23985

    Attachment 23986

    Attachment 23987
    Last edited by edschubert; 06.04.11 at 6:21 PM.
    Ed Schubert
    edschubert@live.com
    757-692-1181

  16. #56
    Senior Member joshuagore's Avatar
    Join Date
    07.21.09
    Location
    Volo/Round Lake
    Posts
    129
    Liked: 0

    Default

    Quote Originally Posted by edschubert View Post
    What did you do with your steering box and master cyl's? I'm not sure if I ever emailed you what I did. Here are pictures. I am not sure if I attached these right. If you would like I can email them to you.

    Attachment 23985

    Attachment 23986

    Attachment 23987


    I kept them where they were, inside the beam.

  17. #57
    Senior Member joshuagore's Avatar
    Join Date
    07.21.09
    Location
    Volo/Round Lake
    Posts
    129
    Liked: 0

    Default

    Maiden voyage around parking lot Cold rotten tires make for good sideways fun until the one man clutch bleed decided it was not going to hold. This is so exciting, now its time to tidy this ride up.

    Josh

  18. #58
    Senior Member joshuagore's Avatar
    Join Date
    07.21.09
    Location
    Volo/Round Lake
    Posts
    129
    Liked: 0

    Default

    So I am having some shift problems. I can get reverse, and one forward gear, but that's all. Any ideas? Sometimes it will even go into reverse when I pull back on the shifter. It seems to be specifically when the car is running, it normally shifts fine when not running. Any specific fluid you might suggest running in the trans?

    Josh

  19. #59
    Senior Member joshuagore's Avatar
    Join Date
    07.21.09
    Location
    Volo/Round Lake
    Posts
    129
    Liked: 0

    Default

    Decided I needed a break from wrenching so a friend and I took some pictures of its current state. It is functionally mostly there... needs the nose finished, but I mounted this temporary one.

    Josh


    http://www.flickr.com/photos/jayjeni...42044186/show/

  20. #60
    Senior Member joshuagore's Avatar
    Join Date
    07.21.09
    Location
    Volo/Round Lake
    Posts
    129
    Liked: 0

    Default

    So who else thinks this would be an awesome paint scheme?

  21. #61
    Senior Member joshuagore's Avatar
    Join Date
    07.21.09
    Location
    Volo/Round Lake
    Posts
    129
    Liked: 0

    Default


    When she is done, I think I will put my vinyl cutter to good use.

  22. #62
    Senior Member
    Join Date
    04.22.08
    Location
    sacramento, ca
    Posts
    790
    Liked: 72

    Default

    Make sure your linkage will rotate far enough clockwise to catch 3rd and 4th. SOmetimes you have to split the distance on the linkage to get all the gears. I recommend a reverse lockout if you can't avoid hitting reverse.
    The above post is for reference only and your results may vary. This post is not intended to reflect the views and opinions of SCCA and should not be considered an analysis or opinion of the rules written in the GCR. thanks, Brian McCarthy, BOD area 9.

  23. #63
    Senior Member
    Join Date
    03.03.09
    Location
    Orlando
    Posts
    261
    Liked: 27

    Default UGHH

    I really hate talented people with tools....

  24. #64
    Senior Member
    Join Date
    03.03.09
    Location
    Orlando
    Posts
    261
    Liked: 27

    Default More Ugh

    Ok... What I meant was.... I hate that I am not talented and have no tools.....

  25. #65
    Senior Member joshuagore's Avatar
    Join Date
    07.21.09
    Location
    Volo/Round Lake
    Posts
    129
    Liked: 0

    Default

    Quote Originally Posted by rdfrancis View Post
    Ok... What I meant was.... I hate that I am not talented and have no tools.....
    That's a big compliment considering its my first non road bars race car build. I had to acquire Welder, brake and sheer, and contract the tube bending... the rest was hand tools. The photography lies too
    Josh

  26. #66
    Senior Member joshuagore's Avatar
    Join Date
    07.21.09
    Location
    Volo/Round Lake
    Posts
    129
    Liked: 0

    Default

    So if all gears but reverse go forward the builders didn't flip the gear right? Any writeup on this change? Seems like a silly thing to do.. bolting it up without flipping the gear, but there were a lot of silly things on this car.
    Josh

  27. #67
    Senior Member
    Join Date
    03.03.09
    Location
    Orlando
    Posts
    261
    Liked: 27

    Default Funny

    Josh,

    All kidding aside... You are doing a great job. Kudos on the welding! Very clean and consistent. Wish mine looked anything like that. Keep working on it. A lot of folks here admire this kind of do it your self work. I like the WWII scheme too! Put a couple 50 cal barrels in the nose and I bet the other cars will stay behind you! Not sure what the GCR has to say about that though... you might want to check first. They may have to go in the pods!!

  28. #68
    Senior Member joshuagore's Avatar
    Join Date
    07.21.09
    Location
    Volo/Round Lake
    Posts
    129
    Liked: 0

    Default

    So the ring was on the 'right' side of the car... if looking from the rear... flipping it to the left side now, maybe I will now have 4 forward gears and 1 reverse gear

    Thanks for the compliments, I think I am switching the from Airforce decal to Naval Aircraft decal as my grandfather was in the the Navy as an airplane mechanic and I think he would appreciate it.

    Josh

    p.s. My number is not 312, just used it because its a Chicago area code.

  29. #69
    Senior Member joshuagore's Avatar
    Join Date
    07.21.09
    Location
    Volo/Round Lake
    Posts
    129
    Liked: 0

    Default

    For being the simplest of all axle setups I have seen it sure is no fun to work on the swing axle. I noticed not one bearing was greased, good thing I took it apart. It looks like minor dis-assembly is required to maintain these things?

    Josh

  30. #70
    Grand Pooh Bah Purple Frog's Avatar
    Join Date
    04.03.01
    Location
    Havana, Fl, USA
    Posts
    10,777
    Liked: 3787

    Default

    The bearings in the outer ends of the swing tubes are lubricated by the sloshing of the trany fluid running out the tube and back. No gease.

    Yours has been sitting up so long all the fluid might have drained back to the trany.

    Very very low maintenance. I've done over 250,000 miles on original German outer bearings in the street car version.


  31. #71
    Senior Member joshuagore's Avatar
    Join Date
    07.21.09
    Location
    Volo/Round Lake
    Posts
    129
    Liked: 0

    Default

    I went to go take her for a test drive and I think I may have overadjusted my clutch slave, as my clutch does nothing now. Prior to doing the ring swap the clutch needed adjustment so I figured I would bring it in, but apparently it can be adjusted TOO much. Time to remove the rear end. Joy I may have heard a click the first time I hit the clutch to test it... now its soft, as in I can pull the arm back with my hand.

    Josh

  32. #72
    Grand Pooh Bah Purple Frog's Avatar
    Join Date
    04.03.01
    Location
    Havana, Fl, USA
    Posts
    10,777
    Liked: 3787

    Default

    I looked back at your pictures. Nothing of good detail of the clutch release arm area.

    I'm assuming you have an external slave cylinder. Make sure it is still working. Maybe bleed it again.

    You'll get the hang of adjusting the arm slack. The arm should be able to move about 1/8"-1/4" before you feel the throwout bearing touch the clutch pressure plate.


  33. #73
    Senior Member joshuagore's Avatar
    Join Date
    07.21.09
    Location
    Volo/Round Lake
    Posts
    129
    Liked: 0

    Default


    I disconnected it only to prepare to remove the trans. It didn't work no matter how far i moved it, and it felt fairly easy to do it by hand.
    Josh

  34. #74
    Contributing Member problemchild's Avatar
    Join Date
    10.22.02
    Location
    Ransomville, NY
    Posts
    5,733
    Liked: 4356

    Default

    I don't know if the newer slave cylinders still do it ..... but the old Neal ones would get messed up if someone played with the pedals when the engine was out. The piston would go too far, and you would get a hydraulic lock, easily fixed by taking the cylinder apart and reassembling. I'd pull the cylinder apart before pulling the car apart.
    Greg Rice, RICERACEPREP.com
    F1600 Arrive-N-Drive for FRP and SCCA, FC SCCA also. Including Runoffs
    2020 & 2022 F1600 Champion, 2020 SCCA FF Champion, 2021 SCCA FC Champion,
    2016 F2000 Champion, Follow RiceRacePrep on Instagram.

  35. #75
    Senior Member joshuagore's Avatar
    Join Date
    07.21.09
    Location
    Volo/Round Lake
    Posts
    129
    Liked: 0

    Default

    Quote Originally Posted by problemchild View Post
    I don't know if the newer slave cylinders still do it ..... but the old Neal ones would get messed up if someone played with the pedals when the engine was out. The piston would go too far, and you would get a hydraulic lock, easily fixed by taking the cylinder apart and reassembling. I'd pull the cylinder apart before pulling the car apart.
    The cylinder still performs properly... it moves more than enough, and moves the arm more than enough. I am going to take another look later today.
    Josh

  36. #76
    Grand Pooh Bah Purple Frog's Avatar
    Join Date
    04.03.01
    Location
    Havana, Fl, USA
    Posts
    10,777
    Liked: 3787

    Default

    Before you split it put a big wrench or pair of plyers on the arm and see if you can manually disengage the clutch.

    I've seen two things that happen:

    1. the arm starts slipping on its axle/shaft.

    2. Sometimes one of the throwout bearing arms breaks.


  37. #77
    Senior Member joshuagore's Avatar
    Join Date
    07.21.09
    Location
    Volo/Round Lake
    Posts
    129
    Liked: 0

    Default

    Quote Originally Posted by Purple Frog View Post
    Before you split it put a big wrench or pair of plyers on the arm and see if you can manually disengage the clutch.

    I've seen two things that happen:

    1. the arm starts slipping on its axle/shaft.

    2. Sometimes one of the throwout bearing arms breaks.


    I can move the arm with my hand, no wrench needed. It is not slipping on the shaft either, checked that out too.
    Josh

  38. #78
    Grand Pooh Bah Purple Frog's Avatar
    Join Date
    04.03.01
    Location
    Havana, Fl, USA
    Posts
    10,777
    Liked: 3787

    Default

    You can move it with your hand, but are you disengaging the clutch when you do?

  39. #79
    Senior Member joshuagore's Avatar
    Join Date
    07.21.09
    Location
    Volo/Round Lake
    Posts
    129
    Liked: 0

    Default

    Quote Originally Posted by Purple Frog View Post
    You can move it with your hand, but are you disengaging the clutch when you do?
    No oops forgot to mention it will move its entire travel by hand, but the clutch does not disengage in the process.
    Josh

  40. #80
    Member Turbowerks9's Avatar
    Join Date
    03.06.11
    Location
    Washington
    Posts
    34
    Liked: 0

    Default

    This entire thread has been great. Keep up the great work. I will be following your tracks soon with a buy of my own. Just have to sell some toys and things and the garage will be ready for a fun project with hopes of racing very soon. Thanks for sharing your build.

Page 2 of 4 FirstFirst 1234 LastLast

Thread Information

Users Browsing this Thread

There are currently 5 users browsing this thread. (0 members and 5 guests)

Posting Permissions

  • You may not post new threads
  • You may not post replies
  • You may not post attachments
  • You may not edit your posts
  •  


About Us
Since 2000, ApexSpeed.com has been the go-to place for amateur road racing enthusiasts, bringing together a friendly community of racers, fans, and industry professionals. We're all about creating a space where people can connect, share knowledge, and exchange parts and vehicles, with a focus on specific race cars, classes, series, and events. Our community includes all major purpose-built road racing classes, like the Sports Car Club of America (SCCA) and various pro series across North America and beyond. At ApexSpeed, we're passionate about amateur motorsports and are dedicated to helping our community have fun and grow while creating lasting memories on and off the track.
Social